It’s a frustrating sight – that faint, cloudy outline where a once-pristine price tag or label once graced your beloved shelves. The stubborn, sticky residue left behind can seem like an impossible challenge, threatening to mar the perfect appearance you’ve worked so hard to maintain. But fear not, dear readers, for we have uncovered the secrets to banishing those pesky adhesive remnants without causing any damage to your precious surfaces.
In this comprehensive guide, we’ll unveil the tried-and-true methods that professional organizers and cleaning gurus swear by, empowering you to reclaim your shelves’ former glory. So, grab your cleaning supplies and get ready to say goodbye to sticky situations for good!
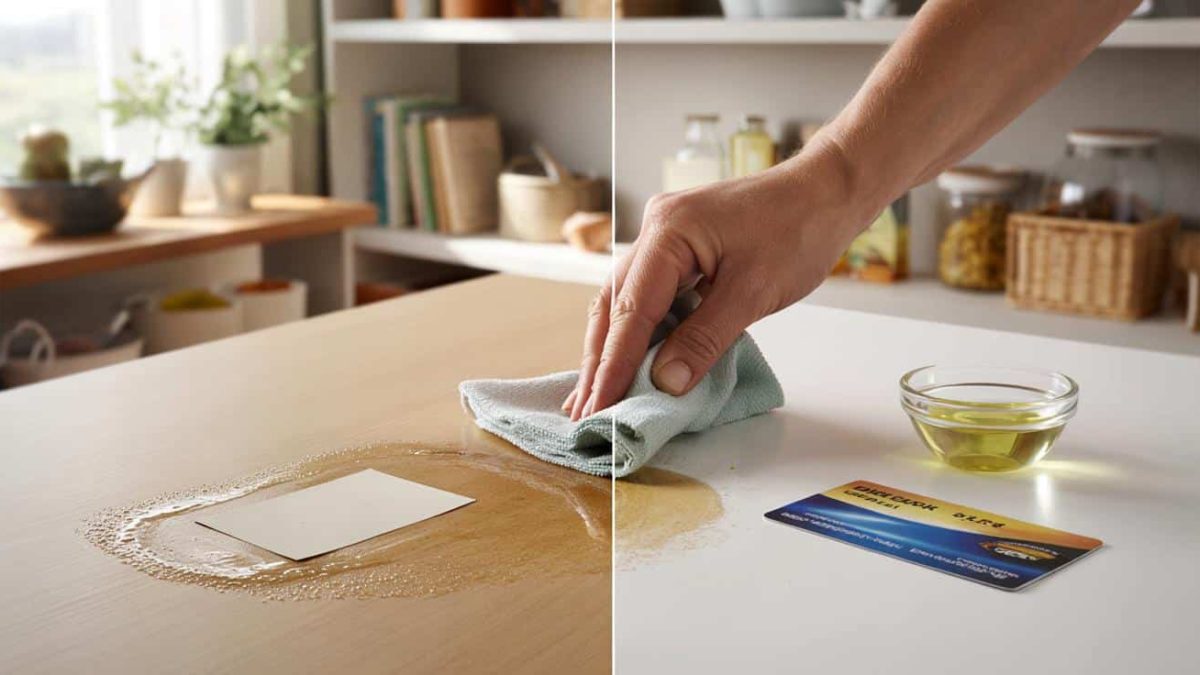
Embrace the Power of Oil: A Gentle, Effective Solution
When it comes to removing stubborn adhesive residue, sometimes the most effective solutions are the most unexpected. Enter the humble oil – your new best friend in the battle against sticky shelves. Whether it’s olive oil, mineral oil, or even baby oil, these gentle yet powerful liquids can work wonders in breaking down the stubborn bonds that hold those pesky remnants in place.
Simply apply a small amount of oil directly to the affected area, let it sit for a few minutes, and then gently wipe away the softened residue with a clean cloth or paper towel. The oil’s lubricating properties help to loosen the adhesive’s grip, making it a breeze to lift off without any risk of damage to your surfaces.
- ➡The Mind-Blowing Habit That Makes People Unstoppably Polite
- ➡Is Your Garden Harboring a Deadly Secret? The Shocking Truth About Snake-Attracting Nightshade
- ➡The Shocking Truth About Protein Bars and Sleep Disruption: What Studies Reveal
- ➡The Shocking Mulch Trick That Stops Weeds For an Entire Year
- ➡Future Free Time: Nobel Physicist, Musk, Gates Prediction on Jobs
- ➡You Won’t Believe What Walking Ahead of Someone Really Means, According to Psychology!
- ➡Shocking Discovery: The Arctic Vortex is Shifting in Unprecedented Ways, Upending Winter Weather Patterns Worldwide
- ➡The Simple Hack That Helps You Crush Your Goals (You Won’t Believe How Easy It Is)
The best part? This method is safe for use on a wide range of materials, from wood and laminate to glass and metal, ensuring your shelves will emerge unscathed and sparkling clean.
Patience and Persistence: Letting Time Work in Your Favor
Sometimes, the key to tackling stubborn adhesive residue lies in simply letting time do the heavy lifting. By applying a generous amount of oil or another solvent to the affected area and allowing it to soak in for an extended period, you can effectively break down the adhesive’s bonds without having to resort to excessive scrubbing or scraping.
This approach is particularly useful for tackling particularly stubborn or long-standing residue, where the adhesive has had time to really set in. Simply apply your chosen solvent, let it work its magic for 15-30 minutes, and then wipe away the softened residue with a clean cloth or paper towel.
Remember, patience is the name of the game here – rushing the process or using too much elbow grease can actually cause more harm than good, potentially scratching or damaging your delicate surfaces. Trust the process, and let time be your ally in the quest for spotless shelves.
- ➡Shocking Discovery! Seal Pup Spotted Seeking Shelter in Family’s Garden After Storm Chandra
- ➡The Shocking Truth About Early Retirement: How a Former Executive Realized He Never Liked His Corporate Self
- ➡The Dark Side of Pet Ownership: Shocking Stories from Animal Shelters
- ➡The Shocking Truth Behind the Wedding Speech That Broke the Internet
- ➡Fusion Energy’s Secret Breakthrough: Japan’s Helical Fusion Gamble Set to Shake Up the Global Race
- ➡The Shocking Truth About the Darkest 6 Minutes of the Century – You Won’t Believe What Happens Next!
- ➡The Surprising Secrets to Rejuvenating Gray Hair Without Dye – Stylists Reveal All!
- ➡The Uniqlo Skirt That Instantly Slims You Down After 50
The Plastic Touch: A Scratch-Free Scraping Solution
For those particularly stubborn adhesive remnants that refuse to budge, even with the help of oils or solvents, a gentle scraping technique can be the key to success. But here’s the catch – you’ll want to steer clear of anything metal, which can leave unsightly scratches and marks on your precious surfaces.
Instead, reach for a plastic scraper or putty knife. These tools are soft enough to avoid causing damage, yet firm enough to lift away the most stubborn of adhesive residues. Gently work the tool under the edge of the residue, applying a bit of pressure to encourage it to peel away cleanly.
Be patient and take your time with this method, and you’ll be rewarded with a surface that’s free of sticky gunk, without a single scratch or blemish in sight.
Prevent Future Residue: A Proactive Approach
As the old saying goes, an ounce of prevention is worth a pound of cure. When it comes to dealing with sticky shelf residue, this couldn’t be more true. By taking a few simple steps to protect your surfaces before applying labels or price tags, you can save yourself a world of trouble down the line.
- ➡Shocking Broom Bob: The Mid-Length Haircut Turning Heads in 2026
- ➡Revealed: How China Transformed Tiny Islands into Unbreakable Fortresses
- ➡The Surprising Life Rule Einstein Swore By (And Why It’s More Important Than Success)
- ➡The Moroccan Air Force’s Shocking Secrets: A Formidable Force Revealed
- ➡Shocking Arctic Collapse on the Horizon: Meteorologists Warn of Extreme Atmospheric Anomalies Set to Ravage the Region in March
- ➡Shocking Court Ruling Forces Homemaker to Pay Alimony to High-Earning Ex-Husband, Sparking Nationwide Outrage
- ➡You Won’t Believe What Happens in the Sky This April – The Eclipse of the Century Revealed
- ➡You Won’t Believe How Much Energy You Can Save With These 2 Simple Tricks
One effective strategy is to lightly coat the area with a thin layer of furniture polish or wax before adhering any labels or stickers. This creates a barrier that prevents the adhesive from bonding too strongly to the surface, making it a breeze to peel off cleanly when the time comes.
Alternatively, consider using removable or repositionable labels and tags, which are designed to lift off without leaving a trace. These handy solutions can save you the headache of dealing with stubborn residue altogether, keeping your shelves looking pristine for years to come.
Tackling Tough Residue: When the Gunk Won’t Budge
Sometimes, even the most diligent efforts with oils, solvents, and plastic scrapers just aren’t enough to conquer the most stubborn of adhesive residues. When that happens, it’s time to bring out the big guns – or, in this case, the slightly more aggressive cleaning tools.
Enter the magic of rubbing alcohol or nail polish remover. These powerful solvents can cut through the toughest of adhesive bonds, breaking them down with ease. Just be sure to test them on a small, inconspicuous area first to ensure they don’t cause any unwanted damage to your surfaces.
- ➡This Household Spice Is Secretly Driving Rats Away (Without Traps!)
- ➡The Shocking Truth About What’s Really in Your Cleaning Water (and Why It Matters)
- ➡The Shocking Toilet Trick That’s Transforming Bathrooms Across the Country
- ➡The Shocking Secrets of the Legendary Spahis Regiment: What Really Happened in Valence?
- ➡The Surprising Pellet Stove Fix That’ll Bring Back the Peace and Quiet You Crave
- ➡Scientists Discover the Shocking Secret Behind the Bowhead Whale’s Incredible 200-Year Lifespan
- ➡Astrology Unlocks Luck for These 3 Zodiac Signs on April 27, 2026
- ➡Discover the Laundry Hack That’ll Have You Ditching Fabric Softener for Good
With a little elbow grease and a steady hand, you can use these strong solvents to lift away even the most tenacious of adhesive remnants, leaving your shelves looking as good as new. Just remember to follow up with a thorough cleaning to remove any lingering chemical residue and restore the shine to your surfaces.
Unlocking the Secrets of Spotless Shelves
Achieving the perfect, residue-free shelves you’ve been dreaming of is well within your reach, thanks to the wealth of tried-and-true techniques we’ve shared in this comprehensive guide. Whether you opt for the gentle power of oil, the patience-driven approach of letting time work its magic, or the precision of plastic scraping, you now have the tools and knowledge to banish those stubborn adhesive remnants for good.
So, take a deep breath, gather your supplies, and get ready to reclaim the pristine, clutter-free shelves of your dreams. With a little elbow grease and a lot of determination, you’ll be well on your way to creating the organized, picture-perfect spaces you deserve. Happy cleaning, and may your shelves shine brighter than ever before!
Expert Insights: What the Pros Have to Say
| Expert | Advice |
|---|---|
| Sarah, Professional Organizer | “When it comes to removing stubborn adhesive residue, patience and the right tools are key. Start with gentler methods like oils and solvents, and only move on to more aggressive techniques if necessary. Protecting surfaces upfront can also save you a lot of hassle down the line.” |
| Michael, Cleaning Consultant | “One of the biggest mistakes people make is trying to scrub away adhesive residue too hard or too quickly. This can lead to scratches, discoloration, and other surface damage. Take your time, let the solvents do their work, and you’ll be rewarded with spotless, undamaged shelves.” |
| Dr. Emily Raines, Materials Scientist | “The key to effectively removing adhesive residue without causing damage is to understand the chemistry at play. Different solvents and oils work better on certain types of adhesives, so it’s important to do your research and test products in an inconspicuous area first. This ensures you’re using the right solution for the job.” |
- ➡You Won’t Believe What Happened When This Snowstorm Struck Major Cities
- ➡Shock Rescue: Woman Saves Drowning Stranger, Only to Discover Devastating Shared Past
- ➡The Surprising Skin Hack That Beats Concealer Every Time
- ➡The 3 Shocking Jobs That Actually Make People Happy (According to Psychology)
- ➡The Surprising Truth About Brown and White Eggs That Will Change How You Shop Forever
- ➡You Won’t Believe What This 25,000-Ton Chinese Ship Can Do – It’s Shocking!
- ➡The Surprising Power of Your Instincts: Unlocking the Secrets Before Your Mind Knows
- ➡The Shocking Danger Lurking in Your Backyard: Pet Owners Beware of Processionary Caterpillars
“Persistence and a light touch are the secrets to spotless shelves.” – Lisa, Professional Cleaner
“Don’t be afraid to try a few different methods until you find the one that works best for your specific situation.” – David, Home Organization Expert
FAQ: Your Sticky Residue Questions, Answered
What’s the best way to remove sticky residue from shelves?
Start with gentle methods like oils or solvents, letting them soak in to break down the adhesive bonds. If that doesn’t work, try a plastic scraper or putty knife to gently lift off the residue. For tough spots, you can use a bit of rubbing alcohol or nail polish remover, but be sure to test it first.
Can I use household cleaners to remove sticky residue?
While some household cleaners may work, they can also be too harsh and potentially damage your surfaces. It’s best to stick to gentler, oil-based solutions or specialized adhesive removers designed for the job.
- ➡The Secret Behind 3 Families Staying in Germany’s Top 500 Richest Until 2025
- ➡Shocking Discovery: Polar Vortex Chaos Isn’t As Rare As You Thought
- ➡The Secret Browser Extension That Blocks Clickbait Titles (You’ll Be Amazed!)
- ➡Unbelievable! Niagara Falls Freeze Solid in Shocking Winter Spectacle
- ➡The Shocking Truth Behind France’s Leap Into Naval Drone Dominance
- ➡Shocking Revelations at the Royal Investiture Ceremony: The Unsung Heroes You Won’t Believe
- ➡The 3 Callous Traits That Expose Ruthless People (You Need to Know)
- ➡The Surprising Cleaning Trick That Restores Dull Porcelain Tile Floors to a Brilliant Shine
How do I prevent sticky residue in the first place?
Before applying labels or stickers, lightly coat the area with furniture polish or wax. This creates a barrier that prevents the adhesive from bonding too strongly. You can also opt for removable or repositionable labels and tags.
What if the residue just won’t come off?
If you’ve tried a variety of methods and the residue still won’t budge, it may be time to consider more heavy-duty solutions like rubbing alcohol or nail polish remover. Just be sure to test these in an inconspicuous area first to ensure they don’t cause any damage.
How do I clean up after removing sticky residue?
Once you’ve successfully removed the adhesive, be sure to give the area a thorough cleaning to remove any lingering solvent or oil residue. Use a clean cloth and warm, soapy water to restore the shine to your surfaces.
Can I use a scrub brush or abrasive cleaner to remove sticky residue?
Avoid using any abrasive tools or cleaners, as they can scratch or damage your surfaces. Stick to soft cloths, plastic scrapers, and gentle, oil-based solutions for the best results.
- ➡The Secret Productivity Hack that Forces You to Achieve Your Goals (You Won’t Believe What Happens Next!)
- ➡Shocking Tax Nightmare Haunts Retiree: The Dark Side of Kindness
- ➡The Shocking Truth About What Tequila, Whisky, and Wine Are Doing to Your Brain (Before You Even Take a Sip)
- ➡The Steam Clean Oven Trick That Melts Away Built-Up Grime Without Any Scrubbing and the Simple Steps to Make It Work
- ➡Shocking Astrology Secrets: What the Blood Moon Reveals About YOUR Zodiac Sign
- ➡The Shrieking, High-Revving Secret That Could Save Europe’s Love Affair with Petrol
- ➡The Surprising Truth About Hand Creams and Why They Could Be Ruining Your Skin
- ➡Shocking £1 Bath Hack That’s Transforming Lawns Everywhere – You Won’t Believe The Results!
How long does it typically take to remove sticky residue?
The amount of time it takes can vary greatly depending on the severity of the residue and the method you’re using. Some quick-and-easy solutions may only take a few minutes, while more stubborn adhesive could require 30 minutes or more of patient work.
Will removing sticky residue leave any permanent marks or discoloration?
If you use the right techniques and tools, you shouldn’t experience any lasting damage or discoloration to your surfaces. However, it’s always a good idea to test in an inconspicuous area first, just to be on the safe side.


