Have your hardwood floors seen better days? Dull, scratched, and discolored wood can make even the coziest home feel neglected. But what if there was a simple, almost magical solution to revive that vintage shine? Prepare to be amazed – the secret to reclaiming your floors’ former glory might be hiding in your pantry.
Homeowners and DIY enthusiasts are rediscovering an overlooked floor care remedy that can breathe new life into worn wooden surfaces. This low-cost, all-natural technique is not only effective, but also easy enough for anyone to try. Get ready to say goodbye to those unattractive scuffs and scratches for good.
Uncovering the Secrets of Vintage Floor Care
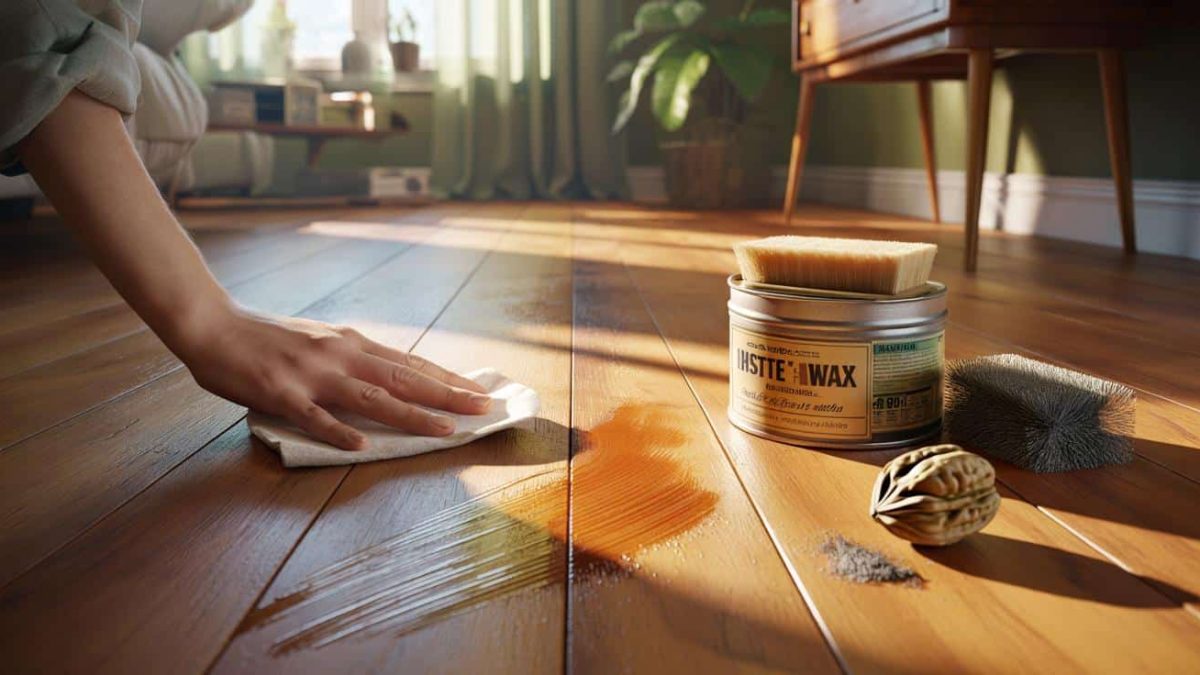
For generations, savvy homeowners have turned to a humble kitchen staple to restore the luster of their hardwood floors – baking soda. That’s right, the same versatile ingredient you use for baking and cleaning can work wonders on tired, weathered wood.
By combining baking soda with a few other common household items, you can create a customized floor polishing solution that tackles everything from stubborn stains to unsightly dents. The best part? This vintage-inspired remedy is not only effective, but also incredibly budget-friendly.
- ➡The Surprising Trick to Make Your Bathroom Smell Like a Luxury Hotel
- ➡The Shocking Secret That Makes Your Garden a Bug Buffet (You Won’t Believe This!)
- ➡Shocking Revelations at the Royal Investiture Ceremony: The Unsung Heroes You Won’t Believe
- ➡The Shocking Reason You Need Aluminum Foil Behind Your Heater (Especially in Old Homes)
- ➡Vanishing Wonders: The Shocking Collapse of Panama’s Vibrant Seas
- ➡The Shocking Collapse of Sustainable Farming: How Green Initiatives Are Betraying the Next Generation of Farmers
- ➡The Shocking Truth About Alcohol and Older Adults You Need to Know Now
- ➡Forget Gold! Aussie Finds Piece of the Solar System Itself
So, what’s the secret formula? Grab a mixing bowl and get ready to transform your floors from drab to fab.
Step-by-Step Guide to Vintage Floor Renewal
To revive your hardwood floors using this old-school technique, you’ll need just a handful of simple ingredients:
| Ingredient | Why It Works |
|---|---|
| Baking soda | This mild abrasive gently buffs away surface scratches and discoloration, revealing the wood’s natural luster. |
| Olive oil | The fatty acids in olive oil help condition and nourish the wood, leaving a smooth, glossy finish. |
| Lemon juice | The acidic properties of lemon juice cut through stubborn grime and stains, restoring the floor’s original color. |
To create your custom floor polish, simply mix equal parts baking soda and olive oil, then add a few tablespoons of lemon juice. Stir the ingredients together until you have a thick, creamy paste.
- ➡The Shockingly Simple Habit That Keeps High-Achievers Calm and Focused
- ➡You Won’t Believe the #1 Healthiest Food on the Planet (Hint: It’s Not Kale!)
- ➡The Dark Underbelly of China’s Solar Dominance: An Exposé You Can’t Afford to Miss
- ➡This Tiny French Firm Is Solving the Green Hydrogen Puzzle No One Knew About
- ➡Shocking Snowstorm Chaos: Businesses Defy Authorities as Drivers Urged to Stay Home
- ➡The Shocking Link Between Alcohol and Cancer Risk – It’s Not What You Think!
- ➡The Unassuming Dish That Transformed My Life – You’ll Never Guess What Happened Next!
- ➡Unlock the Secret to a Thriving Oasis: How to Build a Mesmerizing Mini-Pond on Your Balcony
Using a clean, soft cloth, apply the mixture to the affected areas of your floors in small, circular motions. Let it sit for 5-10 minutes, then buff the surface with a dry cloth to reveal the revitalized wood underneath.
Repeat this process as needed until your floors regain their former shine. With a little elbow grease and this vintage-inspired solution, you’ll be amazed at how quickly those unsightly scratches and stains disappear.
The Transformative Power of Buffing
While the baking soda and oil mixture does the heavy lifting when it comes to restoring your floors, the real magic happens during the buffing process. By applying gentle pressure and using circular motions, you’re essentially polishing the wood to a high gloss.
This buffing technique not only smooths out surface imperfections, but also helps to evenly distribute the conditioning oils, leaving your floors with a uniform, lustrous finish. The more you buff, the more the wood will begin to gleam and sparkle.
- ➡Unearthing the Hidden Treasure: How Coal Waste Could Revolutionize the World’s Energy Future
- ➡Unlock Hidden Savings: The Surprising Benefits of Revisiting Your Spending Habits
- ➡The Shocking Astrological Shift That Will Shatter the Lives of These 3 Zodiac Signs on March 31, 2026
- ➡The Shocking Mistake That’s Ruining Your Car’s Air Conditioning (and How to Fix It)
- ➡Shocking Haircut Transformation for Fine Hair – You Won’t Believe the Results!
- ➡Breakthrough Discovery Ends 30-Year Battle with Depression for 44-Year-Old Patient
- ➡The Butcher’s Trick to Cut the Price of Your French Meat Dishes in Half
- ➡Shocking Breakthrough: Drinking Coffee Could Unlock Your Brain’s Hidden Potential
Don’t be afraid to put in a little elbow grease – the more you work the solution into the floor, the better the results will be. With a bit of time and effort, you can transform even the most worn and weathered hardwood into a showstopping feature of your home.
Maintaining the Vintage Floor Shine
Once you’ve brought your floors back to life with this vintage-inspired remedy, it’s important to maintain that beautiful shine. Fortunately, this is a straightforward process that only requires a few minutes of your time each week.
| Maintenance Tip | Why It Works |
|---|---|
| Regular sweeping and vacuuming | Removing dirt, dust, and debris prevents further scratching and discoloration. |
| Occasional spot cleaning | Treating spills and stains quickly keeps your floors looking their best. |
| Reapplying the baking soda solution | Periodic re-polishing helps maintain that freshly buffed, vintage-inspired shine. |
With just a few simple steps, you can keep your hardwood floors looking showroom-ready for years to come. By staying on top of routine maintenance and the occasional restorative treatment, you’ll be able to enjoy the timeless beauty of your revitalized floors for decades.
- ➡Forget the Microwave – This New Appliance Will Change Your Kitchen Forever
- ➡The Comfortable M&S Leather Sandals That Could Sell Out Everywhere This Summer
- ➡The Yellowstone Geyser That Just Came Back to Life After 6 Years of Dormancy
- ➡The Unsung Feathered Guardians Protecting Our Backyards from the Deadly Asian Hornet Invasion
- ➡The Royal Twist: Kate Middleton’s Surprising Gesture That’s Changing the Game with King Charles III
- ➡Shocking Discovery: 2,200 Vintage Computers Found Buried in Barn After 23 Years
- ➡The Shocking Laundry Secret That’s Ruining Your Fabrics (Revealed!)
- ➡The Shocking Skincare Mistake You’re Probably Making (And How to Fix It)
So, what are you waiting for? It’s time to embrace the power of this vintage floor care secret and transform your home from drab to delightful.
The Joy of Reclaiming the Past
Restoring worn hardwood floors to their former glory isn’t just about improving the aesthetic of your home – it’s about reconnecting with the rich history and tradition of vintage design. By tapping into this old-school floor care technique, you’re not only reviving the look of your floors, but also honoring the craftsmanship and attention to detail that defined an earlier era.
“There’s something truly special about bringing back the shine and character of an older, well-loved hardwood floor,” says interior designer Evelyn Ortiz. “It’s a way of preserving the soul and story of a space, while also modernizing it to suit your personal style.”
Whether your floors are a century old or just a few decades, this simple baking soda-based remedy can help you uncover the timeless beauty that’s been hiding beneath the surface all along. With a little elbow grease and a dash of vintage flair, you can transform your living space and revel in the satisfaction of a job well done.
- ➡The Shocking Link Between Oral Bacteria and Cancer Growth
- ➡From Overtime Grind to Analyst Goldmine: How I Boosted My Earnings Without the Extra Hours
- ➡Unlock the Hidden Power of Your Smartwatch: How the ECG Feature Can Detect Atrial Fibrillation Early
- ➡This Household Item Melts Ice Faster Than Salt (and It’s Cheaper!)
- ➡The Shocking Truth: Why Cities Are Banning These Flowers in Your Yard (And the Steep Fines You Won’t Believe)
- ➡The Shocking Astrological Warning For These Zodiac Signs On March 26, 2026
- ➡The Surprising Reason Your Dog Reaches for Your Hand – You’ll Never Guess Why!
- ➡You Won’t Believe How Germany’s Cybercrime Fighters Are Stopping Hackers in Their Tracks!
As you admire the gleaming, newly-polished floors, you’ll be reminded of the enduring appeal of craftsmanship and the power of DIY ingenuity. It’s a connection to the past that breathes new life into your home and fills you with a sense of pride and accomplishment.
FAQs
How often should I reapply the baking soda solution?
For optimal results, plan to reapply the baking soda and oil mixture every 6-12 months, depending on the amount of foot traffic your floors receive. This will help maintain that freshly polished look and protect the wood from further wear and tear.
Can I use this technique on any type of hardwood floor?
Yes, the baking soda-based floor polish is safe and effective for use on a variety of hardwood species, including oak, maple, cherry, and more. However, it’s always a good idea to test the solution on a small, inconspicuous area first to ensure compatibility with your specific floors.
Do I need to sand or refinish my floors first?
No, the baking soda solution is designed to work on floors in their current condition, without requiring any prior sanding or refinishing. The gentle abrasive action of the baking soda will help smooth out surface imperfections and restore the wood’s natural luster.
- ➡Astronomers Left Speechless by Bizarre 7-Hour Gamma Burst From the Cosmos
- ➡The Shocking Truth: These Nations Face Devastating Floods by 2100
- ➡The Shocking Cosmic Shift That Will Liberate These 2 Zodiac Signs This November
- ➡Shocking Revelation: China’s Secret Crackdown on Polluting “Junk Cars” Sparks Global Uproar
- ➡Shocking Secrets of This French Construction Giant’s Stealth Takeover in Germany
- ➡The Hidden Danger of Climbing Plants: Homeowners Forced to Pay for Wall Damage
- ➡The Shocking Truth About How Smartphones Are Secretly Rewiring Your Brain – And Destroying Your Concentration
- ➡The Shocking Truth About How Your Face is Being Used in Deepfake Tech You Can’t Control
How can I prevent future scratches and discoloration?
In addition to regular sweeping and occasional spot cleaning, you can help protect your floors by placing area rugs in high-traffic zones, using furniture pads, and keeping pet nails trimmed. Reapplying the baking soda solution every 6-12 months will also help maintain that vintage-inspired shine.
Is this technique safe for my home and the environment?
Absolutely! The baking soda, olive oil, and lemon juice formula is non-toxic and eco-friendly, making it a safe and sustainable choice for your home. You can rest easy knowing that you’re reviving your floors without exposing your family to harsh chemicals or fumes.
Can I use this method on laminate or engineered wood floors?
While the baking soda solution is primarily designed for use on solid hardwood floors, you can also try it on laminate or engineered wood surfaces. However, it’s important to test the mixture in a small, inconspicuous area first to ensure it doesn’t damage the floor’s finish.
How do I dispose of the used floor polish?
Simply wipe up any excess polish with a clean, dry cloth and discard it in your regular household trash. The baking soda, oil, and lemon juice components are all biodegradable, so you don’t need to worry about special disposal methods.
- ➡The Shocking Truth About How a Custom AI Agent Can Save You 2 Hours a Day on Email Triage
- ➡The Surprising Budget Dark Chocolate Brands That Outshine the Luxury Options
- ➡These Jaw-Dropping Tricks Will Help You Sell Your Car for Top Dollar (and Fast!)
- ➡The Secret Behind China’s Lightning-Fast 10-Story Building: You Won’t Believe What They Did!
- ➡The Jaw-Dropping Metamorphosis of Marius Commando: Action Hero Rewriting the Rules of Modern Warfare
- ➡Shocking Discovery: Young Korean Mathematician Cracks One of the Toughest Math Problems of the Century
- ➡The Controversial Fuel Price Transparency Shakeup: Consumer Empowerment or Big Oil’s Dirty Trick?
- ➡The Surprising Kitchen Hack That Restores Scorched Stovetops to Brand-New Condition
Can I add any other ingredients to the baking soda solution?
While the basic baking soda, olive oil, and lemon juice formula is highly effective on its own, you can experiment with adding a few drops of essential oils for a custom scent. Lavender, lemon, or orange oil can provide a subtle, pleasant fragrance to your floors.


