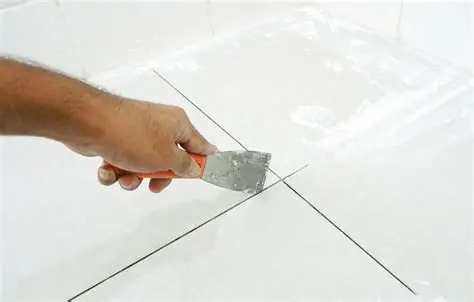
If you’ve ever looked at your bathroom tiles and cringed at the sight of grimy, discolored grout, you’re not alone. Tackling a full bathroom renovation can seem like an overwhelming and expensive undertaking. But what if we told you there’s a simple, 15-minute hack that can make your grout look brand new without the need for a total overhaul?
Homeowners across the country are raving about this life-changing grout transformation technique, and the results are nothing short of jaw-dropping. Imagine walking into your bathroom and seeing sparkling, fresh-looking grout that makes the whole space feel clean and rejuvenated. It’s a game-changer that could save you thousands on a costly renovation.
The Secret Ingredient That Makes Grout Look Brand New
The key to this incredible grout hack is a simple, everyday household item you likely already have in your pantry. By combining baking soda, hydrogen peroxide, and a few other common ingredients, you can create a powerful cleaning solution that lifts away years of grime and discoloration in just 15 minutes.
The secret is in the chemical reaction between the baking soda and hydrogen peroxide, which helps to break down and dissolve even the toughest stains and mold buildups. Plus, the added ingredients help to restore the grout’s original color and sheen, leaving your bathroom looking fresh and renewed.
- ➡Shocking Comeback: France’s Drone Dominance Stuns Finland
- ➡Discover the Secret Superhero Plant Turning German Gardens into Year-Round Oases
- ➡Shocking Blizzard Reveals Truth Nobody Told You About the Dangers Overnight
- ➡The Hidden Climate Bomb Ticking in the Arctic – You Won’t Believe What’s Coming
- ➡The Shocking Secrets Your Garden Needs to Thrive This March
- ➡The Shocking Truth About Deadly Superbugs Invading Hospitals Nationwide
- ➡The Shocking Reason You Should Sleep on It Before Buying That New Outfit
- ➡The Shocking Secret Dozens of US Jets Converging on the Middle East – You Won’t Believe What Happens Next!
Best of all, this grout-transforming solution costs just a few dollars to make, making it a budget-friendly alternative to expensive professional cleaning services or tile replacements.
The 3 Ingredients That Transform Grout in 15 Minutes
| Ingredient | Purpose |
|---|---|
| Baking Soda | Acts as a powerful abrasive to scrub away grime and discoloration. |
| Hydrogen Peroxide | Helps to break down and dissolve tough stains, mold, and mildew. |
| Dish Soap | Provides additional cleaning power and helps to cut through grease and oil buildup. |
To create the grout-transforming solution, simply mix together equal parts baking soda and hydrogen peroxide, then add a few drops of dish soap. Apply the mixture directly to the dirty grout, let it sit for 15 minutes, and then scrub it away with a stiff-bristled brush. The results will leave you amazed at the dramatic difference in your bathroom’s appearance.
Techniques to Maximize Your Grout Transformation
While the basic grout-cleaning solution is a game-changer on its own, there are a few additional techniques you can use to take your bathroom’s transformation to the next level. One popular method is to use a small, handheld steam cleaner to blast away stubborn stains and discoloration.
- ➡Discover the Fountain of Youth in Your Brain: How Exercise Can Visibly Reverse Aging in Adults
- ➡The Shocking Secrets Google Maps Hides From Most Users
- ➡The Surprising Way to Start Your Day More Balanced and Centered
- ➡Unbelievable Robot Shocks the World with Uncanny Human Mimicry
- ➡Ukraine’s Shocking 20-Year Security Demand Revealed: A Game-Changer for World Peace?
- ➡The Shocking Dental Secret That Could Predict Your Death
- ➡5 Secrets to Keep Your Cool When Emotions Flare Up (You Won’t Believe #3)
- ➡Shocking Pellet-Saving Secrets You Need to Know Before Winter 2026
The high heat and pressurized steam help to penetrate deep into the porous grout, lifting away years of built-up gunk and grime. For areas with particularly tough stains, you can also let the cleaning solution sit for up to 30 minutes before scrubbing to give it more time to work its magic.
Another effective technique is to use a grout brush or small scrub brush with stiff bristles to really agitate the solution and work it into the grout lines. This helps to ensure maximum coverage and penetration for a thorough, long-lasting clean.
Dealing with Tough Stains and Mold
If you’re dealing with deeply ingrained stains or stubborn mold and mildew growth, the basic grout-cleaning solution may not be enough. In these cases, you can try adding a bit of lemon juice or white vinegar to the mix for extra cleaning power.
The acidic properties of these ingredients help to break down tough organic matter, making it easier to scrub away. You can also try using a small amount of baking soda and hydrogen peroxide as a paste, letting it sit for 10-15 minutes before scrubbing, to tackle particularly stubborn problem areas.
- ➡Unlock the Secret to Instantly Transforming Your Garden with This One Shrub!
- ➡The 2 Surprising Skills That Reveal True Brilliance (Psychologists Agree)
- ➡Shocking New Moisturizer Overtakes Nivea and Neutrogena as the Holy Grail of Hydration
- ➡The Hidden Sign of Emotional Intelligence That Can Make You Irresistible
- ➡The Unbelievable Comeback: Zidane’s Return to Real Madrid Sparks Fan Frenzy
- ➡France’s $1 Billion Carrier Sunk by Russian Missiles: The Shocking Truth
- ➡The Controversial Tree That’s Getting Banned Across Cities – And the Shocking $1,000 Fines You Need to Know About
- ➡The Shocking Dangers of the Plastic Bag Oven Hack: What Home Cooks Need to Know
And if you’re still not seeing the results you want, don’t be afraid to repeat the cleaning process a few times. Grout can be surprisingly resilient, and it may take a couple of applications to get it looking its absolute best.
Protecting Your Sparkling Grout
| Tip | Description |
|---|---|
| Seal the Grout | Apply a grout sealer after cleaning to help protect it from future stains and discoloration. |
| Regular Maintenance | Wipe down the grout with a damp cloth or mop once a week to prevent buildup. |
| Avoid Harsh Cleaners | Steer clear of acidic or abrasive cleaners that can damage the grout over time. |
Once you’ve achieved that gleaming, fresh-looking grout, you’ll want to do everything you can to protect your investment. Applying a high-quality grout sealer is a must, as it creates a protective barrier that prevents future stains and discoloration.
You should also make a habit of wiping down the grout with a damp cloth or mop once a week to keep it looking its best. And be sure to avoid harsh, acidic or abrasive cleaners, as these can actually break down the grout over time.
- ➡The Chilling Reality of Deepfakes: How Manufactured Chaos Is Eroding Trust in a Digital World
- ➡Unlock Instant Calm: The Surprising Comfort of a Bowl of Food
- ➡The Shocking Secret That’s Making Medical Reports Unintelligible (And How AI Can Finally Make Them Understandable)
- ➡Shocking Secrets: The Vinyl Records Worth Thousands (Even Millions) That You Need to Know About
- ➡The Surprising Reason Why Scandinavians Can’t Get Enough of These Comfy Spring Shoes
- ➡The Surprising Reason Why Bees Prefer Certain Flowers (And Ignore Others)
- ➡The Shocking Truth Behind Your Washing Machine’s Countdown You Need to Know Now!
- ➡The Surprising Power of One Simple Question to Instantly Captivate Any Conversation
With just a little bit of regular maintenance, you can keep your bathroom’s grout looking sparkling and new for years to come.
Avoiding Common Mistakes for the Best Results
While this grout-transforming hack is relatively simple, there are a few common mistakes homeowners make that can sabotage their efforts. One of the biggest is not properly preparing the surface before applying the cleaning solution.
Be sure to thoroughly sweep or vacuum the grout lines to remove any loose dirt or debris, as this can prevent the solution from penetrating effectively. You should also make sure to use a stiff-bristled brush or scrubber to really agitate the mixture and work it into the grout.
Another mistake is not letting the solution sit long enough before scrubbing. The chemical reaction between the baking soda and hydrogen peroxide needs at least 15 minutes to work its magic, so be patient and resist the urge to scrub too soon.
- ➡The Dark Secrets of Becoming a French Foreign Legion Officer Exposed: What They Don’t Want You to Know
- ➡Unearthing the Secrets of a Medieval Tunnel: Archaeologists Discover a Mysterious Passageway in the Harz Mountains
- ➡You Won’t Believe What These Engineers Just Built Underwater!
- ➡The Shocking Reason Why Your Garden Plants Have Holes in Their Leaves (and How to Fix It)
- ➡The Mind-Blowing Habit That Makes People Unstoppably Polite
- ➡The Surprising Reason Why Skipping Meals Can Make You Feel Dizzy (And What to Do About It)
- ➡The Shocking Secrets Hiding Within the Lille Military Barracks!
- ➡Shocking Proof: Orcas Breaching Melting Ice Shelves a Desperate Hoax to Push Climate Agenda
When to Call in the Professionals
“While this DIY grout-cleaning hack is incredibly effective for most homeowners, there are some cases where it’s best to call in a professional. If you’re dealing with extensive mold or mildew growth, or if the grout is so badly damaged that it’s starting to crumble, it’s usually best to have an expert take a look.”
– Sarah Johnson, Certified Bathroom Renovation Specialist
Professionals have access to more heavy-duty cleaning solutions and equipment that can tackle even the toughest grout problems. They can also assess the overall condition of your tiles and grout and make recommendations for any necessary repairs or replacements.
While the DIY grout hack is a game-changer for many homeowners, there’s no shame in calling in the experts if you’re in over your head. Your bathroom’s appearance and the long-term health of your tiles are worth the investment.
- ➡Unlock the Secret to a Jaw-Dropping Garden Oasis All Summer Long
- ➡Shock Discovery: China’s Satellite Beats Starlink with Laser Internet from 22,236 Miles Up
- ➡Unlock the Secret to Combating Loneliness: The Top 4 Online Communities for Organizing Themed Walks in Your Area
- ➡Shocking Revelations: Chimpanzees’ Secret Alcohol Habits Exposed
- ➡The Shocking Discovery That Could Upend Your Entire Kitchen Cleaning Routine: Why You Need to Ditch the Sponge and Grab This €3 Hygiene Hack
- ➡The One Hair Rule Women Over 50 Need to Know (Or Risk Aging 10 Years Overnight)
- ➡The Hidden Superpower Trapped in Your Memories: Why Some People Can’t Let Go of Past Conversations
- ➡The Shocking Secret Signal All Bikers Know (But Nobody Told You)
FAQs: Transforming Your Grout in 15 Minutes
How often should I clean my grout?
For best results, it’s recommended to clean your grout every 6-12 months, depending on the amount of foot traffic and usage in your bathroom.
Can this method be used on colored grout?
Yes, the baking soda and hydrogen peroxide solution is effective for cleaning both white and colored grout. Just be sure to test it on a small, inconspicuous area first to ensure it doesn’t discolor the grout.
Will this damage my tiles?
No, the cleaning solution is safe for use on most tile surfaces, including ceramic, porcelain, and natural stone. However, it’s still a good idea to test it on a small area first to be on the safe side.
How long does the grout transformation last?
With proper maintenance and sealing, the results of this grout-cleaning hack can last for several years. Regular wiping down and the occasional touch-up cleaning will help keep your grout looking its best.
- ➡Unearthed Ancient Highway Stuns Experts—Uncover the Secrets of This 2,200-Year-Old Marvel
- ➡The Secret Trick Hydrangea Lovers Must Do Before March (Or Risk No Blooms)
- ➡The Shocking Satellite Images Exposing Secrets of the Iberian Peninsula
- ➡Shocking Astrology Forecast: These 4 Zodiac Signs Will Become Millionaires by 2026
- ➡Unlock the Insane Pilates Hack That’s Reshaping Fitness at Lidl – You Won’t Believe the Price!
- ➡The Elegant and Natural Gray Long Bob: The Sophisticated Hairstyle for Women Over 50
- ➡Shocking Revelation: Brave Students Defy Sleep for 60 Hours, But at What Cost?
- ➡The Secret to Quenching Hyderabad’s Thirst: How Veolia’s Record-Breaking Water Contract is Transforming India’s Second-Largest City
Do I need any special tools or equipment?
Beyond the basic cleaning ingredients, the only other tool you’ll need is a stiff-bristled brush or scrubber to agitate the solution. A small steam cleaner can also be helpful for tackling tough stains.
Can I use this method on floors as well as walls?
Absolutely! The baking soda and hydrogen peroxide solution works equally well on floor and wall grout, making it a versatile solution for transforming your entire bathroom.
How much does it cost to have a professional clean my grout?
Professional grout cleaning services can range anywhere from $200 to $500 or more, depending on the size of your bathroom and the extent of the grout damage. The DIY hack is a much more budget-friendly option.
Will this method work on caulk as well?
While the baking soda and hydrogen peroxide solution can help clean and brighten caulk, it’s not the best long-term solution. For best results, it’s recommended to replace any damaged or discolored caulk with a fresh application.
- ➡The Shocking Secrets to Navigating Career Transitions During Economic Uncertainty and Industry Disruption
- ➡Beware the Chilling Truth About the Polar Vortex: What You Aren’t Being Told
- ➡Breakthrough Discovery Ends 30-Year Battle with Depression for 44-Year-Old Patient
- ➡Shocking Astrology Reveal: The March 28, 2026 Date Will Trigger an Emotional Crisis for These Zodiac Signs
- ➡Bacterial Superbombs: The Secret Weapon Obliterating Tumors From Within
- ➡Shocking Astrology Secrets: What the Blood Moon Reveals About YOUR Zodiac Sign
- ➡Unlocking the Secrets of Custom Fanatec Rims: My Surprising Discovery of the ClubSport Wheel Rim GT3
- ➡The Incredible 500-Year-Old Clam That Defied Time (And Met a Tragic End)


