As the days grow longer and the sun shines brighter, gardeners across the country are gearing up for the warm weather ahead. But with rising water prices and dried-out planters, many are searching for clever ways to keep their beloved plants hydrated during the hot, dry months. Enter a humble kitchen accessory that could be the key to saving your garden from summer’s scorching heat.
This unassuming item, when strategically placed in your outdoor oasis, can act as a lifeline for thirsty foliage. Discover how a simple sponge can transform your gardening routine and ensure your flowers, herbs, and vegetables thrive even in the most challenging conditions.
Soak Up the Savings: How a Kitchen Sponge Can Revolutionize Your Garden
As water bills climb and drought conditions become more widespread, finding ways to conserve this precious resource is crucial for green-thumbed enthusiasts. Burying a kitchen sponge in your soil can be a game-changer, acting as a low-cost, eco-friendly irrigation system that keeps your plants hydrated for longer.
The science behind this hack is surprisingly simple. The sponge’s porous structure acts like a natural wick, drawing up moisture from the ground and slowly releasing it to the surrounding roots. This steady, controlled flow of water helps reduce evaporation and ensures your plants get a consistent drink, even during the hottest, driest spells.
- ➡Hundreds of Passengers Left Abandoned Across Australia as Sydney, Melbourne, Brisbane and Perth Airport Delayed 314 and Cancelled 47 Flights, Disrupting Qantas, United, Emirates, Singapore Airlines and Others in Los Angeles, Abu Dhabi, Dubai, London and More
- ➡Discover the Secret Superfruit You Need to Grow This Winter for a Shocking Spring Harvest
- ➡China’s Arctic Takeover: The Shocking Truth About Their Daring Voyages Reshaping Global Trade
- ➡The Shocking Truth About Nivea Cream: Experts Reveal the Worst Thing You Can Do for Your Skin Health
- ➡This Shocking Study Reveals the Truth About Alternative Cancer Treatments – You Won’t Believe the Results!
- ➡The Shocking Reason You Need Aluminum Foil Behind Your Heater (Especially in Old Homes)
- ➡Brace for the Epic Blizzard of the Century: Officials Warn of Catastrophic Impacts Across the Region
- ➡The Hidden Danger in Your Kitchen Cabinet: How Baking Soda Ruined My Vegetable Garden
Best of all, this clever technique can be tailored to suit any type of garden – whether you’re tending to a small balcony, a lush backyard, or a community plot. By strategically positioning sponges around your beds and planters, you can create a personalized watering system that takes the guesswork out of maintaining a thriving outdoor oasis.
Prepping the Sponge: From Kitchen Clutter to Gardening Ally
Before you start burying sponges in your garden, it’s important to properly prepare them for their new role. After all, you don’t want to inadvertently create a breeding ground for harmful bacteria or pests.
Begin by giving your sponges a thorough cleaning. Soak them in a diluted bleach solution to kill any lingering germs, then rinse them thoroughly and allow them to air dry. This simple step helps ensure your sponges are sanitized and ready to be introduced to your soil without causing any unintended issues.
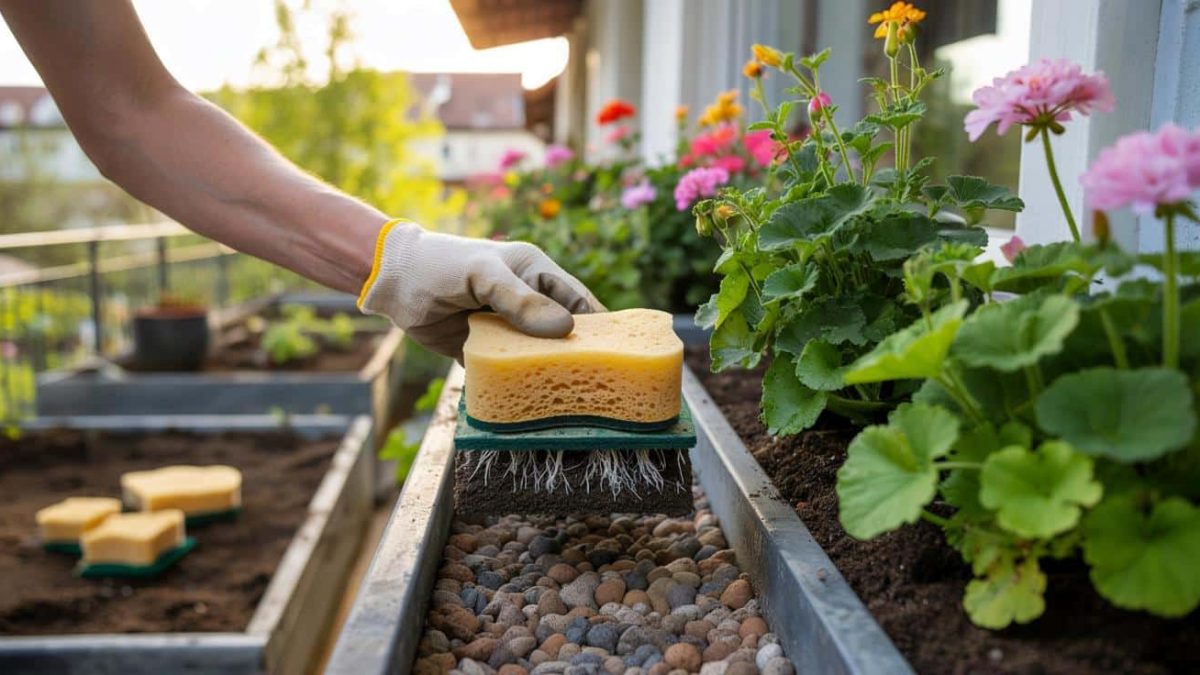
Once your sponges are clean, you can start experimenting with their placement. Try positioning them a few inches below the surface, surrounding the base of your plants or along the edges of raised beds. This strategic placement allows the sponges to draw moisture from deep within the soil, keeping your greenery hydrated from the roots up.
- ➡This Simple Balcony Trick Destroys Mosquitoes and Flies for Good – You Won’t Believe the Secret!
- ➡The Shocking Secret Fruits That Revolutionize Gut Health (You Won’t Believe #5!)
- ➡The Shocking Truth About Range-Extending Hybrid Electric Vehicles: Miracle or Mirage?
- ➡Retired Delivery Driver Receives Over $800,000 in Online Donations: The Incredible Story That’s Warming Hearts Worldwide
- ➡The Shocking Truth About Mercury in Your Canned Tuna – Are You Eating the Safest Variety?
- ➡Shocking Discovery: China Builds Artificial Islands in the South China Sea and Rewrites the Rules of Geopolitics
- ➡Ditch the Expensive Solar Lights: Turn Kitchen Scraps Into Enchanting Garden Lanterns
- ➡You Won’t Believe the Astonishing Secrets of the World’s Largest ‘Tree’
Sponge-Powered Gardening: Surprising Ways to Use This Hydration Hack
The humble kitchen sponge isn’t just a savior for thirsty plants – it can also breathe new life into other areas of your garden. From enriching your compost to creating custom self-watering containers, this versatile little accessory has a host of unexpected uses that can streamline your outdoor maintenance tasks.
For example, adding shredded sponges to your compost bin can help improve soil structure and moisture retention. As the sponges break down, they release stored water and nutrients, giving your homemade fertilizer an extra boost. This simple trick can be a game-changer for gardeners who struggle with dry, compacted soil.
Sponges can also be repurposed into DIY self-watering planters – perfect for busy urbanites or those with limited outdoor space. By lining the bottom of a container with a sponge and filling it with soil, you can create a low-maintenance oasis that draws moisture up to the roots as needed. This ingenious hack ensures your plants stay hydrated, even when you’re away from home for extended periods.
Potential Pitfalls and Problem-Solving Tips
While the sponge gardening trick can be a game-changer, it’s important to be mindful of a few potential pitfalls. Choosing the right type of sponge is crucial – you’ll want to avoid anything with added chemicals or abrasives that could harm your plants. Opt for natural, biodegradable varieties instead.
- ➡Unlock the Profound Connection: The Micro-Moment That Can Change Everything
- ➡The Shocking Truth About Heat Pumps That No One Told You
- ➡The Shocking Desert Transformation Happening in the Gulf – You Won’t Believe What They’re Doing!
- ➡Shocking Revelation: Diabetes Drugs Linked to Sudden Vision Loss Epidemic
- ➡The Shocking Way Your Smartphone is Secretly Rewiring Your Brain (And How to Take it Back)
- ➡Your Job Could Be Automated: What Nobel Laureates, Elon Musk, and Bill Gates Predict About the Future of Work
- ➡The Unbelievable Flower That Turned My Doorstep Into a Local Sensation
- ➡You’ll Never Guess Which Veggie Is Actually a Secret Superfood (And It’s Not Kale!)
Proper placement is also key. Bury the sponges too shallow, and they may dry out too quickly. Go too deep, and you risk cutting off vital oxygen to the roots. Experiment with different depths and locations to find the sweet spot for your specific garden setup.
Finally, keep an eye out for any signs of mold or fungal growth. While the initial bleach treatment helps mitigate these risks, it’s important to monitor your sponges and replace them as needed to maintain a healthy, thriving garden.
Cultivating a Drought-Resistant Oasis: The Big-Picture Benefits
Beyond the immediate relief this sponge hack can provide for your parched plants, there are broader implications for your garden’s long-term health and sustainability. By reducing your reliance on frequent watering, you can lower your overall water consumption and play a role in preserving this precious resource.
Additionally, the improved soil moisture and nutrient retention afforded by the sponges can help your plants develop deeper, more resilient root systems. This strengthens their ability to withstand periods of drought and extreme heat, making your garden more adaptable to the challenges posed by climate change.
- ➡The Eye-Opening Age When Men Finally Become Emotionally Mature
- ➡The Shocking Truth Behind Decathlon’s E-MTB Price Plunge – You’ll Never Guess What Happened Next!
- ➡Unlocking the Secrets of the Sahara: Archaeologists Uncover Ancient Desert Lake Graveyard
- ➡If your house feels noisy, this small change can make it feel calmer instantly
- ➡You Won’t Believe How This US Warship Blasted Drones Out of the Sky with a Powerful Laser Weapon
- ➡The Surprising Winter Clothing Secret That’ll Keep You Toasty Warm (Hint: It’s Not Jeans!)
- ➡The Shocking Truth: Ancient Humans Left a Bigger Footprint Than You Thought
- ➡The Shocking Astrological Forecast Revealing Who Will Find Love in 2026
So as you prepare your outdoor spaces for the warm weather ahead, consider giving this simple sponge trick a try. It just might be the secret weapon that transforms your garden into a lush, water-wise oasis that thrives all season long.
Frequently Asked Questions
What type of sponge works best for this gardening hack?
Look for natural, biodegradable sponges without any added chemicals or abrasives. Cellulose or natural sea sponges are great options.
How do I prepare the sponges before burying them?
Start by thoroughly cleaning the sponges in a diluted bleach solution to kill any bacteria or mold. Rinse them well and allow to fully air dry before placing them in the soil.
Where should I position the sponges in my garden?
Bury the sponges a few inches below the soil surface, surrounding the base of your plants or along the edges of raised beds. This allows them to draw moisture from deep in the ground.
- ➡The Shocking Reason You Feel Invisible Even When Surrounded by Others
- ➡The Surprising Kitchen Ingredient That Leaves Your Windows Spotless (and Streak-Free!)
- ➡The Shocking Liver Cancer Symptoms You Might Be Ignoring (Experts Reveal the Truth)
- ➡Shocking New Study Reveals the Truth About Home Births vs. Hospital Deliveries
- ➡The Shocking Diabetes Trick Your Doctor Never Told You: A 10-Minute Walk After Meals Can Slash Blood Sugar Spikes
- ➡The Shocking Secret Diary Her Daughter Was Never Supposed to Read
- ➡The US Scrambles as Russia and China Dominate the Arctic Icebreaker Race
- ➡The Secret to Instant Relaxation? This Hearty Meal Holds the Answer
How often do I need to replace the sponges?
Monitor your sponges for signs of deterioration or mold growth, and replace them as needed – typically every 1-2 growing seasons.
Can I use this technique for all types of gardens?
Yes! The sponge hydration hack can be adapted for everything from small balconies to sprawling backyard plots and community gardens.
Will the sponges attract pests or create other problems?
As long as you properly clean and sanitize the sponges before use, they shouldn’t attract unwanted critters or create other issues in your garden.
How much can this hack really save on my water bills?
By reducing the frequency and amount of watering required, the sponge trick can potentially cut your outdoor water usage by 20-30% or more, leading to significant cost savings.
- ➡Moon’s Hidden Secret: What China Just Unearthed Will Shock You
- ➡Shocking Discovery: Extending Licenses for Elderly Drivers Divides the Country and Puts Roads at Risk
- ➡I’m 63 and Nobody Talks About the Fact That the Hardest Part of Retirement Isn’t Boredom — It’s Realizing Your Entire Identity Was Built on Being Needed and Now You’re Just a Person With Nowhere to Be at 9 AM on a Tuesday
- ➡Shocking Discovery: Satellites Uncover Colossal 35-Meter Waves Raging in the Pacific
- ➡The Surprising Secrets to Making Your Natural Grey Hair Look Stunning (You Won’t Believe #3!)
- ➡The Dollar’s Reign Over: China Just Became World’s Economic Superpower
- ➡Sunken Secrets Surfaced: 80-Year-Old French Submarine Discovered Off Spanish Coast
- ➡Blizzard Mayhem: Businesses Fight to Stay Open as City Grinds to a Halt
Are there any other uses for old sponges in the garden?
Yes! Shredded sponges can be added to compost bins to improve soil structure and moisture retention. They can also be repurposed into DIY self-watering planters.


