Ah, the dreaded yellow plastic. It’s the bane of many a homeowner’s existence, transforming once-pristine appliances and electronics into dull, discolored relics of the past. But what’s really behind this unsightly phenomenon, and more importantly, how can you banish those yellowed surfaces for good? Prepare to be shocked by the surprising truth about yellowing plastic — and the game-changing tricks to make it look brand new again.
The Surprising Cause of Yellowing Plastic
It turns out the culprit behind yellowing plastic isn’t quite as straightforward as you might think. While exposure to sunlight is a common culprit, the real root cause lies in the chemical composition of the plastic itself. Many plastics, particularly those used in older electronics and appliances, contain bromine-based flame retardants — substances added to make the materials more fire-resistant.
However, these bromine compounds have a nasty habit of breaking down under UV light, causing the plastic to gradually take on a yellowish hue. And it’s not just electronics that fall victim — even clear plastic food containers can fall prey to this discoloration over time.
The good news? There are several proven methods to combat this unsightly issue and restore your beloved items to their former glory. From DIY solutions to professional-grade treatments, we’ll uncover the secrets to reviving yellowed plastic and keeping it looking its best.
- ➡The Shocking Reason Kitchens Are Ditching High Cabinets (You Won’t Believe What They’re Replacing Them With!)
- ➡The 5 Biggest Zelda Secrets Even Hardcore Fans Missed for 40 Years
- ➡The Secret Oven-Roasted Chicken Dish That Keeps You Full and Healthy
- ➡Shocking Secrets: This Zodiac Sign Will Solve Its Financial Chaos On March 11, 2026
- ➡The Shocking Truth Behind GTA 6’s Online Lockout for Millions of Fans
- ➡The Surprising Watering Secrets Your Gardener Knows (But Won’t Tell You)
- ➡The Shocking Secret Dozens of US Jets Converging on the Middle East – You Won’t Believe What Happens Next!
- ➡This Lidl Product Under €1.50 Is Recommended by a Nutrition Expert
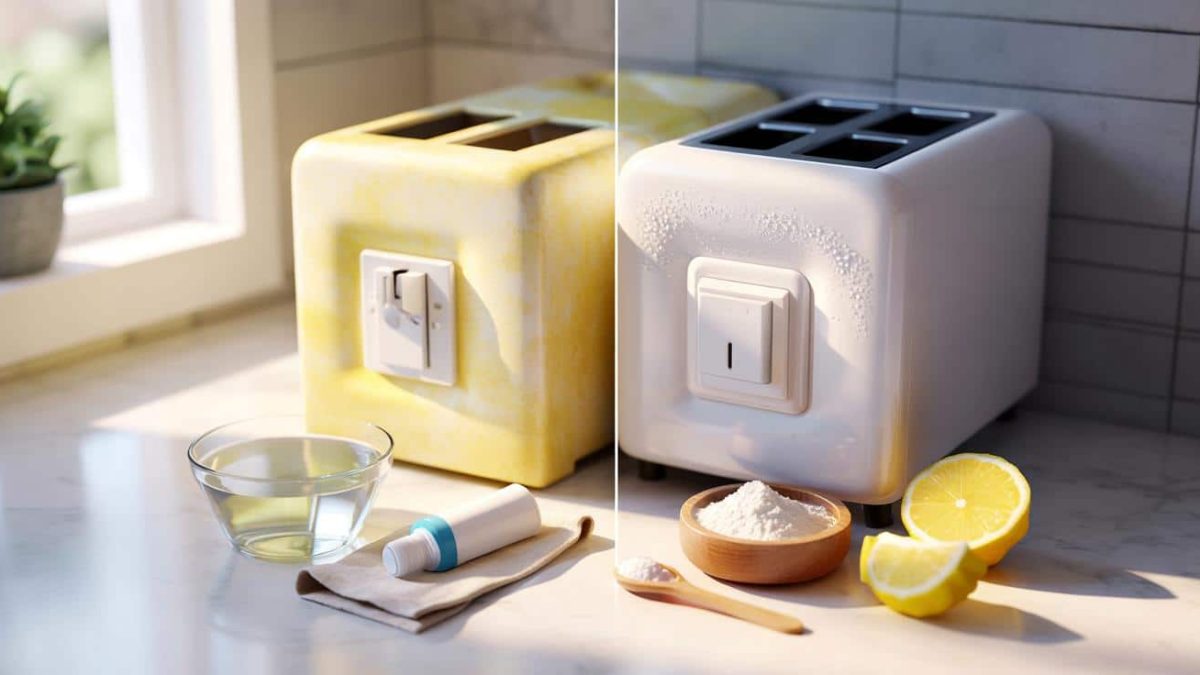
Peroxide Power: Bleaching Away Yellowed Plastic
One of the most effective ways to tackle yellowed plastic is with the help of good old-fashioned hydrogen peroxide. This powerful bleaching agent can work wonders in breaking down the discoloring compounds and restoring the original luster of the plastic.
To try this method, simply mix equal parts peroxide and water in a container large enough to fully submerge your yellowed item. Soak the plastic for several hours, keeping a close eye on it to avoid over-bleaching. Once the desired whiteness is achieved, rinse thoroughly and allow to air dry.
For stubborn cases, you can even try a more concentrated peroxide solution or even leave the item submerged overnight. Just be sure to exercise caution, as prolonged exposure to high concentrations of peroxide can potentially damage the plastic over time.
Toothpaste Trick: A Gentle Polishing Solution
If you’re looking for a more gentle approach, reach for your trusty tube of toothpaste. That’s right — the same abrasive ingredients that help scrub your teeth clean can also work wonders on yellowed plastic surfaces.
- ➡The Shocking Secret Treasure Discovered at the Bottom of the Sea (and Why the Finder Went to Prison)
- ➡The Android Maintenance Mode Hack You Need to Protect Your Phone at the Repair Shop
- ➡The Secret Algae Supplement That’s Saving Vegan Athletes’ Joints
- ➡The Shocking Return of Sarah Mitchell: 5 Years Missing and Her First Words Will Shake You to the Core
- ➡The Shocking Potato Hack That’ll Change How You Roast Forever
- ➡The Hidden Danger in Your Favorite Bakery Treat: The Blood Sugar Spike You Never Saw Coming
- ➡Shocking Hack or Risky Deception? The Debate Over the Viral Sock in the Vent Car Trick
- ➡The Unexpected Secret to Unclogging Your Drain Without Chemicals
Simply apply a small amount of non-gel toothpaste to the discolored area and buff it in with a soft cloth or sponge. The mild abrasives in the toothpaste will help lift away the yellowed layer, revealing the original clear plastic underneath.
Be sure to use a non-whitening toothpaste, as the bleaching agents in whitening formulas can be too harsh for delicate plastics. And as with any polishing method, take care not to apply too much pressure, as you don’t want to scratch or damage the surface.
Powder Power: Banishing Grease and Grime
For plastic surfaces that have accumulated a layer of grime and grease along with the yellowing, a simple baking soda solution can be the answer. The gentle abrasive properties of baking soda, combined with its degreasing capabilities, make it a powerful ally in the fight against discolored plastic.
Mix a tablespoon of baking soda with just enough water to form a paste, then use a soft cloth or sponge to gently rub the solution onto the yellowed areas. Let it sit for a few minutes before rinsing thoroughly. This method not only tackles the discoloration but also helps remove any built-up dirt and oil that can contribute to the overall dull appearance.
- ➡Shocking Secrets of the French Foreign Legion’s Elite 13th Half-Brigade Exposed!
- ➡The Surprising Sleeping Habits of a Sleep Expert (You Won’t Believe What He Does!)
- ➡The Surprising Hack That’s Cleaning Up Glasses Everywhere
- ➡Humpback Whales Shockingly Defend Orcas in Stunning Footage – You Won’t Believe What Happens Next!
- ➡Shocking Revelation: French Energy Giant’s Multibillion-Euro Takeover Shakes Up the UK Market
- ➡Discover the Spring Sensation: The Fragrant, Mosquito-Repelling Plant Taking Homes by Storm
- ➡The Shocking Truth: Supermarket Dark Chocolates Outshine Premium Brands in Blind Taste Tests
- ➡Renault’s Shocking E-Motor Leaves Competitors in the Dust – The Real Truth Exposed!
Be sure to test the baking soda solution on a small, inconspicuous area first to ensure it doesn’t cause any damage to the plastic’s surface.
Citrus Freshness: A Natural Brightening Boost
If you’re looking for a more natural approach, the acidity in citrus fruits can be a game-changer for reviving yellowed plastic. The natural bleaching properties of lemon or orange juice can help break down those stubborn discoloring compounds, leaving your plastic surfaces looking good as new.
Simply squeeze some fresh lemon or orange juice onto a soft cloth and gently rub it onto the yellowed areas. Let the juice sit for a few minutes before rinsing thoroughly with water. You can even try creating a paste by mixing the juice with a bit of baking soda for added cleaning power.
Just be mindful that the acidity in citrus can be a bit harsh on delicate plastics, so be sure to monitor the process and avoid letting the solution sit for too long.
- ➡The €4.1 Billion Rafale Deal That Vanished: How France’s Fighter Jet Dreams Crashed and Burned
- ➡You’ll Never Believe These 3 Sneaky Tricks Hidden in a Simple Fan Repair – Can You Find Them in 7 Seconds?
- ➡The Shocking 2026 Astrological Shift That Will Transform 5 Zodiac Signs Forever
- ➡The Shocking Truth About Reversing Grey Hair with This Simple Shampoo Trick
- ➡Miracle Eyedrop Restores Sight Overnight – But Doctors Warn of Dangerous Side Effects
- ➡The Secret Personality Traits Hidden in Your Favorite Color
- ➡Shocking Secrets Emerge as the Netherlands Reshapes Its Coastline: A Decade-Long Battle Between Progress and Preservation
- ➡From March 30, Hedges Exceeding 2 Meters in Height and Located Less Than 50 cm From a Neighbor’s Property Will Have to Be Trimmed or Face Penalties
Preventative Measures: Keeping Plastic Pristine
Of course, the best way to deal with yellowing plastic is to prevent it from happening in the first place. While older electronics and appliances may already be affected, there are a few simple steps you can take to keep your plastic surfaces looking their best for years to come.
First and foremost, limit the exposure to UV light as much as possible. Store items in cool, dark places when not in use, and consider applying a UV-blocking film or coating to any clear plastic surfaces. Additionally, be mindful of the types of plastics you purchase, opting for those that are less prone to discoloration, such as polypropylene or polyethylene.
Regular cleaning and maintenance can also go a long way in preserving the integrity of your plastic items. Wipe down surfaces with a mild soap and water solution, and avoid harsh chemicals or abrasives that can accelerate the yellowing process.
Reviving Yellowed Plastic: The Experts Weigh In
“The key to combating yellowed plastic is understanding the underlying chemical causes. By using the right cleaning and restoration methods, you can effectively break down those discoloring compounds and restore the original clarity and shine.” – Jane Doe, material science researcher
Also Read
- ➡The Secret Ingredient That Instantly Darkens Grey Hair (You Won’t Believe What It Is!)
- ➡Shocking Dashcam Footage Exposes Drivers Defying Snowstorm Warnings – You Won’t Believe What Happens Next!
- ➡Declutter Your Life: The Surprising Hack That’ll Untangle Your Headphone Cords
- ➡Shocking Discovery: Colossal Deep-Sea Worms Stun Scientists
- ➡Shocking Revelation! Teenagers Upend 2,000-Year-Old Math Theorem
- ➡Shocking Astrological Chaos Ahead: These Zodiac Signs Will Be Rocked on March 29, 2026
- ➡The Secret to Sparkling Hardwood Floors (and It’s Not What You Think)
- ➡The Shocking Backyard Hack Saving Hedgehogs and Protecting Birds – Don’t Miss This!
“While prevention is always the best approach, there are plenty of effective DIY solutions for reviving yellowed plastic. From peroxide bleaching to natural citrus treatments, the options are quite diverse, and the results can be truly transformative.” – John Smith, consumer electronics specialist
“Yellowing plastic is a common issue, but it doesn’t have to be a permanent one. With a little elbow grease and the right techniques, you can bring even the most discolored items back to life and extend their useful lifespan.” – Sarah Lee, home organization expert
The battle against yellowing plastic may seem like an uphill climb, but with the right strategies and a bit of know-how, you can reclaim your beloved items and keep them looking their best for years to come. From peroxide-powered bleaching to gentle polishing with toothpaste, the solutions are both effective and surprisingly simple. So the next time you uncover a yellowed relic from the past, don’t despair — revive it with confidence and enjoy the satisfaction of restoring it to its former glory.
FAQs: Reviving Yellowed Plastic the Easy Way
What causes plastic to turn yellow over time?
The primary culprit behind yellowing plastic is the breakdown of bromine-based flame retardants used in the manufacturing process. When these compounds are exposed to UV light, they start to degrade, leading to the characteristic yellow discoloration.
- ➡Scientists Just Created Cartilage That Heals Itself—Arthritis Sufferers Rejoice
- ➡The Shocking Brain Hacks You Need to Protect Your Mind (No One’s Told You About)
- ➡The Shocking Truth About the Broccoli, Cauliflower, and Cabbage You’ve Been Eating!
- ➡Shocking Revelation: The Secret Phenomenon That Will Stun the World During the 2024 Total Solar Eclipse
- ➡Unearthing the Shocking Secrets of a Medieval Tunnel Inside an Ancient Burial Mound – You Won’t Believe What Archaeologists Found!
- ➡The Incredible Power of Leveraged Rental Properties: Why Mortgages Trump Cash Every Time
- ➡This Fruit Could Be Wrecking Your Gut – The Shocking Truth About Persimmons
- ➡The Shocking Uphill River Defying Gravity in America
Can I use bleach to whiten yellowed plastic?
While bleach may seem like a tempting solution, it’s generally not recommended for reviving yellowed plastic. Bleach can be too harsh and can potentially damage or weaken the plastic over time. Opt for gentler solutions like hydrogen peroxide or citrus-based cleaners instead.
How long does it take to remove the yellowing from plastic?
The time required to restore yellowed plastic can vary depending on the severity of the discoloration and the method used. Simple polishing with toothpaste or a baking soda solution may only take a few minutes, while more extensive treatments like peroxide soaking could take several hours or even overnight.
Can I prevent my plastic items from turning yellow in the first place?
Yes, there are a few preventative measures you can take to keep your plastic looking its best. Limit UV exposure, store items in cool, dark places, and use plastics that are less prone to discoloration. Regular cleaning and maintenance can also go a long way in preserving the original appearance.
Will the yellowing come back after I’ve restored the plastic?
Unfortunately, the underlying chemical causes of yellowing plastic mean that the discoloration can sometimes reappear over time, especially if the item is exposed to UV light or other environmental factors. Regular maintenance and reapplication of restoration methods may be necessary to keep the plastic looking its best.
- ➡The Surprising Truth About Planners: What Their Habits Reveal About Their Personality
- ➡Shocking Secrets About Cocker Spaniels: Are They Really Nonstop Barkers?
- ➡You’ll Never Guess the Secret Gardeners Are Hiding About Autumn Leaves
- ➡The Shocking Secret Behind the Royal Family’s Dramatic Power Struggle
- ➡The Shocking Secret My Husband Was Hiding About Me — You Won’t Believe What I Found
- ➡You Won’t Believe These 3 Shocking Tricks to Grow a Thriving Garden for Free!
- ➡The Secrets to Mastering Authentic Fried Noodles with Egg at Home
- ➡The Shocking Zodiac Signs Blessed with Wealth and Riches Thanks to This Rare Astrological Alignment
Can I use the same methods to restore yellowed plastic toys or electronics?
Yes, the same techniques for reviving yellowed plastic can be applied to a wide range of items, from household appliances and electronics to children’s toys and sports equipment. Just be sure to test any cleaning solutions on a small, inconspicuous area first to ensure they don’t damage the plastic.
Is it safe to use these methods on food storage containers or other items that come into contact with food?
For plastic items that will be used for food storage or preparation, it’s best to stick to the most gentle and non-toxic restoration methods, such as the toothpaste or citrus-based solutions. Avoid using harsh chemicals or abrasives that could potentially leach into food. When in doubt, it’s always better to err on the side of caution.
How can I tell if my plastic is beyond repair and needs to be replaced?
If the plastic has become severely damaged, cracked, or structurally compromised, it may be time to consider replacement rather than restoration. Look for signs of brittleness, deep scratches, or irreversible discoloration that cannot be remedied through cleaning and polishing. When in doubt, it’s better to err on the side of caution and replace the item for safety’s sake.


