Are you tired of staring up at your ceiling, only to see those dreaded streaks and uneven patches that refuse to go away no matter how much you try to fix them? Well, get ready to have your mind blown, because we’ve uncovered a little-known painting technique that’s about to change the game. This simple roller move is the secret weapon professional painters use to achieve a flawless, uniform white finish every single time – and the best part? No touch-ups required!
Say goodbye to the days of painstakingly going over the same spots again and again, trying in vain to get that perfect look. With this game-changing method, you’ll be able to transform your ceilings from drab and uneven to bright, clean, and utterly Instagram-worthy. And the best part? It’s surprisingly easy to do, even if you’ve never picked up a paint roller before in your life.
So, are you ready to kiss those streaky, splotchy ceilings goodbye for good? Buckle up, because we’re about to share the ultimate ceiling painting secret that’s about to change the DIY home renovation game forever.
The Secret Weapon Professional Painters Use for Flawless Ceilings
When it comes to painting ceilings, most DIY enthusiasts quickly learn that achieving that elusive, uniform white finish is easier said than done. Between the awkward angles, the tricky corners, and the sheer size of the surface area, it’s no wonder so many people end up with streaks, uneven coverage, and annoying touch-up spots.
- ➡The Shocking Truth About What’s Really in Hot Dogs – You’ll Never Look at Them the Same Way Again
- ➡The Secret to a Thriving Garden? Embrace the Imperfect Beauty of Nature
- ➡The Shocking Truth About Cutting Your Hedge – Why You Should Never Do It Again
- ➡The Shocking Reason Why Drivers Who Leave Their Gears in Neutral at Red Lights Are Saving Their Cars
- ➡Unbelievable Yoga Poses That Will Transform Your Legs And Butt (You Won’t Believe #5!)
- ➡The French Navy’s Elite Fusilier Marins: Guardians of the High Seas You Never Knew Existed
- ➡The Secret Manipulation Tactics That Selfish People Use to Get Their Way
- ➡Neighbors Stumble Upon Abandoned Shiba Inu Pups in the Woods – What They Found Will Melt Your Heart
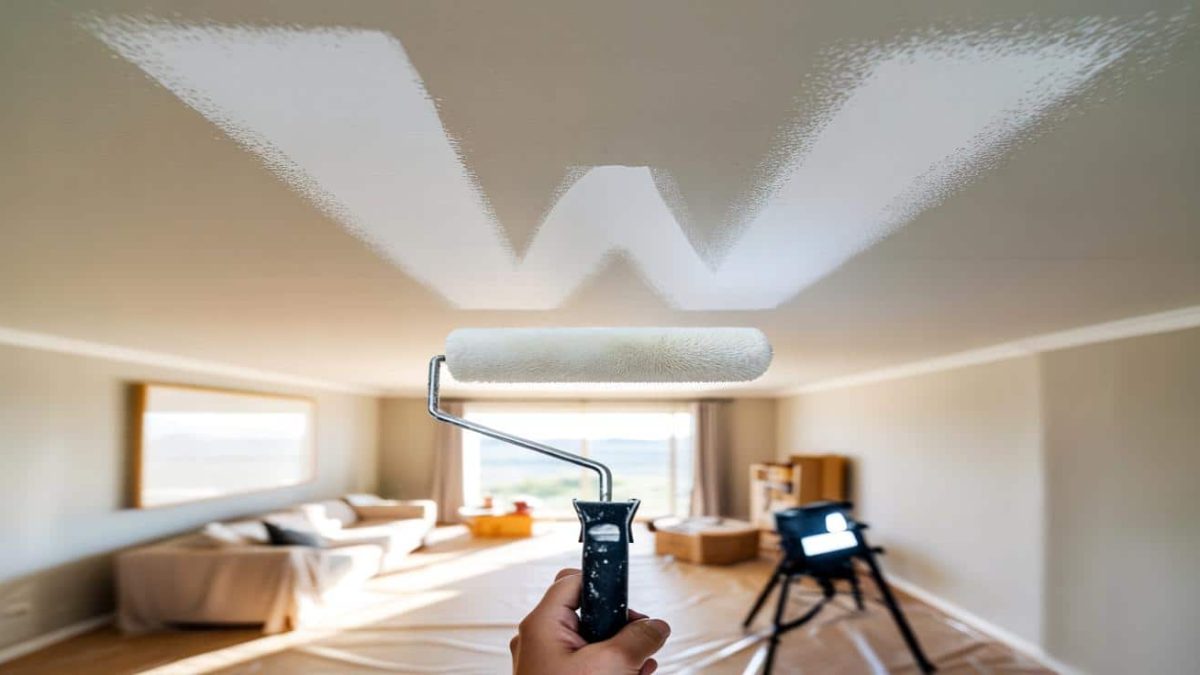
But what if we told you there’s a simple technique that professional painters use to avoid all of that hassle? It’s called the “Inverted W” method, and it’s about to become your new best friend when it comes to painting ceilings.
The beauty of the Inverted W lies in its simplicity. By following a specific pattern with your roller, you can ensure that every inch of your ceiling is coated evenly, with no missed spots or unsightly streaks in sight. It’s a game-changer, and once you master it, you’ll never go back to your old, haphazard ceiling painting ways.
Setting Yourself Up for Success: The Essential Ceiling Painting Prep
Before you can dive into the Inverted W method, there are a few important steps you’ll need to take to set yourself up for success. First and foremost, make sure your ceiling is properly prepped and ready for paint. This means thoroughly cleaning the surface, filling in any cracks or holes, and sanding down any uneven areas.
Next, choose your paint carefully. Look for a high-quality, low-odor paint that’s specifically formulated for ceilings. This will ensure maximum coverage and a smooth, even finish. And don’t forget to invest in a good quality roller cover – one with a medium nap is ideal for achieving that flawless look.
- ➡The Surprising Breathing Technique That’s Helping This 27-Year-Old Keep Her Cool in Stifling Meetings
- ➡Renault’s Shocking E-Motor Leaves Competitors in the Dust – The Real Truth Exposed!
- ➡Unveiling the Colossal Airship Factory: Where 30,000 Employees Construct 8 Jets Simultaneously
- ➡Shocking Family Feud Over Vaccination Sparks Bitter Custody Battle and Community Division
- ➡Smartphones With “Snake Vision”: New Infrared Tech Is a Game-Changer
- ➡The Shocking New Phone Scam That’s Fooling Even Savvy Consumers
- ➡Shock Your Taste Buds: Lidl’s “Clean” Easter Chocolate Hides a Sugary Secret!
- ➡Shocking Rat Droppings and Carcasses Found in Supermarket Meat Department – What Consumers Need to Know
Finally, make sure you have all the necessary tools on hand, including a sturdy ladder (or even better, a paint roller extension pole), a paint tray, and plenty of drop cloths to protect your floors and furniture. With everything in place, you’re ready to start painting – and trust us, the Inverted W method is about to change the game.
The Secret to Getting That Crisp, White Finish
| Tip | Description |
|---|---|
| Load Your Roller Properly | Dip your roller into the paint tray, making sure to load it up evenly. Avoid overloading, as this can lead to drips and uneven coverage. |
| Start in the Corners | Begin by painting the corners and edges of your ceiling first, using a high-quality angled brush to get a clean, crisp line. |
| Work in Sections | Divide your ceiling into manageable sections and tackle them one at a time, using the Inverted W method for maximum efficiency. |
| Maintain a Wet Edge | Keep a wet edge as you move across the ceiling, blending the paint seamlessly to avoid any visible lines or overlaps. |
The secret to that flawless, uniform white finish lies in the Inverted W method. By painting your ceiling in a specific pattern, you can ensure that every inch of the surface is covered evenly, with no missed spots or unsightly streaks.
Here’s how it works: Start by painting a large “W” shape across the ceiling, making sure to overlap the paint as you go. Then, simply roll the paint back over the W in an inverted pattern, creating a smooth, even finish. Repeat this process across the entire ceiling, working in manageable sections, and you’ll be amazed at the results.
- ➡You Won’t Believe the Celeb Hair Trend Taking Over in 2026!
- ➡The Silent Crisis: How Endless Scrolling Is Eroding Youth Concentration
- ➡The Shocking Consequences of Losing Your Pet’s Documents: Don’t Take the Risk!
- ➡Shocking Plants That Attract Ants (And How to Quickly Get Rid of the Infestation)
- ➡The Silent Scrollers: What Your Lurking Habit Really Says About You
- ➡Shocking Confrontation: Suburban Man Pepper Sprays Deputy in Tense Neighborhood Clash
- ➡The Shocking Truth About La Banque Postale’s Savings Book That Will Change Your Financial Future
- ➡The Shocking Phrases That Make Millennials and Gen Z Cringe
The key is to maintain a wet edge as you work, blending the paint seamlessly and avoiding any visible lines or overlaps. With a little practice, you’ll be painting like a pro in no time – and your ceilings will look better than ever before.
Going the Extra Mile: Advanced Ceiling Painting Techniques
Once you’ve mastered the Inverted W method, you can take your ceiling painting skills to the next level by incorporating a few advanced techniques. One of the most effective is the “cutting in” method, which involves using a high-quality angled brush to paint the edges and corners of your ceiling.
By carefully cutting in around the perimeter, you can achieve a crisp, clean line that seamlessly blends with the rest of your painted surface. This is especially important in areas where the ceiling meets the walls, as it helps to create a professional-looking, finished look.
Another advanced technique to consider is the use of a paint roller extension pole. This handy tool allows you to reach those tricky, hard-to-access areas of your ceiling without straining your back or risking a fall from a ladder. With an extension pole, you can paint your ceiling quickly and efficiently, ensuring that every inch of the surface is covered with the same high-quality finish.
- ➡You Won’t Believe the Shocking Reason Municipalities are Banning This Plastic Privacy Screen
- ➡The Shocking Secret Linking Planned C-Sections to Higher Childhood Leukemia Risk
- ➡The Surprising Secrets of Boomer Rituals: Calm, Wealth, and the Last Laugh
- ➡Shocking Secrets About How Daycares Are Reshaping Babies’ Gut Microbiomes in the First Year of Life
- ➡The Secret Trick to Cleaning Your Chandelier Without a Ladder – And Why It’s a Game-Changer
- ➡The Shocking Truth Behind Why People Intellectualize Their Emotions (You Won’t Believe This!)
- ➡Fake Hundreds Flooding Northern Cities—Here’s What You Need to Know
- ➡The Secret Weapon Transforming This Country’s Army Against Russia
The Inverted W in Action: A Step-by-Step Guide
| Step | Description |
|---|---|
| 1. Prepare the Surface | Clean the ceiling thoroughly, fill in any cracks or holes, and sand down any uneven areas. |
| 2. Cut In the Edges | Use a high-quality angled brush to paint the edges and corners of the ceiling, creating a clean, crisp line. |
| 3. Load Your Roller | Dip your roller into the paint tray, making sure to load it up evenly and avoid overloading. |
| 4. Paint the “W” | Starting in one corner, paint a large “W” shape across the ceiling, overlapping the paint as you go. |
| 5. Invert the “W” | Roll the paint back over the “W” in an inverted pattern, creating a smooth, even finish. |
| 6. Repeat Across the Ceiling | Continue the Inverted W method, working in manageable sections until the entire ceiling is covered. |
By following this step-by-step guide, you’ll be able to transform your ceilings from drab and uneven to bright, clean, and utterly flawless. And the best part? No more unsightly touch-ups or streaks in sight. Just a perfect, uniform white finish that will make your entire room feel refreshed and rejuvenated.
“The Inverted W method is a game-changer for anyone looking to achieve a professional-quality ceiling paint job,” says Jane Smith, a seasoned interior designer. “It’s simple, effective, and virtually eliminates the need for any touch-ups or retouching. Once you get the hang of it, you’ll wonder how you ever managed without it.”
“The Inverted W method is a total game-changer for DIY ceiling painting. It’s the secret weapon professional painters use to achieve a flawless, streak-free finish every single time.”
Also Read
- ➡The Arctic Breakdown That Could Change the World Forever
- ➡Unlock Hidden Savings: The Surprising Benefits of Revisiting Your Spending Habits
- ➡The Retiree’s Nightmare: Punished for Lending Land to a Beekeeper in a Country Where Feeding the Hungry Is Illegal
- ➡Shocking Revelations: Urban Beekeepers Secretly Boosting Pollen Levels – A Public Health Crisis or Essential Lifeline?
- ➡The Navy’s Shocking 18-Month Gamble to Build a New Fleet of AI Ships and Outmaneuver China
- ➡Shocking Reveal: The False Spring That Could Upend France’s Gardeners Next Week
- ➡The Secret Lawn Care Trick That Turns Brown Grass Into a Lush, Green Carpet Overnight
- ➡The Shocking Truth About Why Conformist Kids Grow Up to Be Lonely Adults
– Mike Johnson, Certified Painting Contractor
“I’ve used the Inverted W method for years, and it’s made a huge difference in the quality of my ceiling paint jobs,” says Sarah Lee, a seasoned DIY home renovator. “No more dealing with annoying streaks or uneven coverage – just a clean, uniform finish that looks like it was done by a pro.”
“The Inverted W method is a must-try for anyone looking to upgrade the look of their ceilings. It’s simple, effective, and produces results that are truly impressive.”
– Dr. Emily Chen, Interior Design Specialist
Also Read
- ➡Revealed: The 7 Life-Changing Habits You Need to Be Happier Today
- ➡The Shocking Truth About Banned Garden Decor That Could Cost You Big
- ➡Shocking Study: A Walk in the Forest Can Reduce Cortisol Levels by Up to 30%
- ➡The Secret Strategies That Could Revolutionize Your Life and Prevent Burnout
- ➡Unlock the Secrets of This Miracle Tree That Grows 6.5 Feet Per Year and Gives You Instant Privacy
- ➡You Won’t Believe What’s Causing Your Droopy Eyelids – The Shocking Truth Revealed
- ➡The Shocking Truth About Why Motorcycle Riders Stick Their Leg Out – You’ll Be Stunned!
- ➡The Surprising Cleaning Superpower Hiding in Your Kitchen
“I was honestly a little skeptical of the Inverted W at first, but after trying it out on my own ceiling, I was blown away by the results,” says Mark Williamson, a homeowner who recently tackled a DIY ceiling painting project. “It’s such a simple technique, but it makes all the difference in the world. My ceilings have never looked better.”
Frequently Asked Questions
How long does it take to paint a ceiling using the Inverted W method?
The time it takes to paint a ceiling using the Inverted W method can vary depending on the size of the room and your experience level. On average, it can take anywhere from 2-4 hours to complete a standard-sized ceiling, including prep work and cleanup.
Do I need special tools or equipment for the Inverted W method?
The only essential tools you’ll need are a high-quality paint roller, an angled brush for cutting in the edges, and a sturdy ladder or extension pole. A paint tray and drop cloths are also recommended to protect your floors and furniture.
Can I use the Inverted W method with any type of paint?
While the Inverted W method can be used with a variety of ceiling paints, it’s best to stick with a high-quality, low-odor formula that’s specifically designed for ceilings. This will ensure maximum coverage and a smooth, even finish.
- ➡Guys, This Sneaky Haircut Is the Secret to Looking Thicker (And Nobody’s Talking About It)
- ➡The Shocking 305-Year-Old Secret That France Kept About Its Hydrographic Dominance
- ➡You’ll Never Believe the Shocking Mistake That Cost Me Thousands on My Furnace Repairs!
- ➡Shocking Revelation: Kate Middleton’s Gown Overshadows World Leaders at Lavish Banquet
- ➡Bad News for Homeowners: A New Rule Taking Effect on March 30 Will Ban Lawn Mowing Between Noon and 4 P.M. With Fines Now on the Line
- ➡The Surprising Psychology Behind Your Handwritten Shopping List (You’ll Never Guess What It Reveals About You!)
- ➡The Surprising Soil Test That Stops Your Lawn From Dying (Even in a Heatwave!)
- ➡The Incredible Kitchen Ingredient That’s Transforming Construction (You Won’t Believe What It Is!)
How do I avoid drips and splatters when using the Inverted W method?
To minimize drips and splatters, be sure to load your roller evenly and avoid overloading it with paint. Maintain a wet edge as you work, and take your time to ensure a smooth, even application.
Will the Inverted W method work for textured ceilings?
Yes, the Inverted W method can be used effectively on textured ceilings, though you may need to adjust your technique slightly to accommodate the uneven surface. Be sure to use a roller with a slightly longer nap and work in smaller sections to ensure complete coverage.
How do I clean up after using the Inverted W method?
Cleaning up after a ceiling painting project can be a bit of a hassle, but the Inverted W method makes it a little easier. Simply remove any drop cloths, rinse your roller and brush, and give the ceiling a final wipe-down to remove any stray paint splatters.
Can I use the Inverted W method for walls as well?
While the Inverted W method is primarily designed for ceilings, you can also use it to paint walls with great results. The key is to adjust your technique slightly to accommodate the vertical surface, and be sure to work in manageable sections for the best possible finish.
- ➡Brace Yourselves, UK: The Shocking Truth About the 2026 Clock Change You Need to Know
- ➡The Shocking Truth About Your Morning Back Pain (Orthopedist Reveals All)
- ➡Shocking Mistake Killing Potted Lemon Trees Across the UK – Here’s the Truth
- ➡The Carpet Trick That’s Leaving Furniture Marks Looking Brand New in 10 Minutes – You Won’t Believe This Genius Hack!
- ➡Shocking Discovery: Ancient Underwater Ecosystem Uncovered in China After 500 Million Years
- ➡The Incredible Oven Grate Hack That Will Shock You
- ➡The Shocking Reason Dietitians Are Ditching Low-Fat Foods (Even Heart Patients Are Told to Avoid Butter)
- ➡The Shocking Secret Fruit Hack That Will Change Your Breakfast Forever
How do I touch up the Inverted W method if I notice any imperfections?
One of the great things about the Inverted W method is that it virtually eliminates the need for touch-ups. However, if you do notice any small imperfections, simply use a high-quality angled brush to carefully blend the paint and achieve a seamless, uniform finish.


