Imagine the horror of having friends or family over, only to realize your once-pristine tile floors have turned into a grout-fueled nightmare. That sinking feeling as you realize your sparkling clean home has become a dingy, discolored mess. But what if I told you there’s a shockingly simple solution that doesn’t involve harsh chemicals like vinegar or bleach? Prepare to have your mind blown.
In this exclusive exposé, we’ll uncover the real culprit behind blackened grout and reveal a game-changing grout cleaning hack that will leave your floors looking brand new. Forget everything you thought you knew about scrubbing and scraping – this method is a total game-changer.
The Surprising Cause of Discolored Grout (Hint: It’s Not Just Dirt)
Before we dive into the cleaning solution, it’s important to understand what’s really causing that unsightly grout discoloration. While many assume it’s simply a buildup of dirt and grime, the true culprit is often something much more insidious: mold and mildew.
Tile grout is a porous material, making it the perfect breeding ground for these microscopic invaders. As moisture seeps into the grout, mold and mildew take hold, quickly spreading and staining the once-pristine surface. Traditional cleaning methods often fail to fully eradicate these stubborn growths, leading to a never-ending cycle of discoloration.
- ➡The Shocking Household Cleaning Routine You’ve Been Getting Wrong This Whole Time
- ➡The Shocking Truth About Separating Art from the Artist’s Misdeeds
- ➡The Shocking NASA Experiment That’s Revolutionizing Sleep for Millions
- ➡Revealed: The Gargantuan French Steel Giant Fueling the UK’s Nuclear Future
- ➡Forget Everything You Know: The Dacia Sandero’s Shocking Electric Transformation Will Change the Game
- ➡Shocking Missile Production Imbalance: Iran Outpaces Israel and the US in Rocket-Building Capacity
- ➡The Shocking Secrets Hiding in Your Nivea Cream
- ➡Retiree’s Act of Kindness Backfires: How Lending Land to a Beekeeper Became a Bureaucratic Nightmare
But fear not – we’ve uncovered a game-changing solution that targets the root cause and leaves your grout looking like new. Get ready to say goodbye to those unsightly black and brown stains for good.
The Grout Cleaning Hack That Actually Works (No Vinegar or Bleach Required)
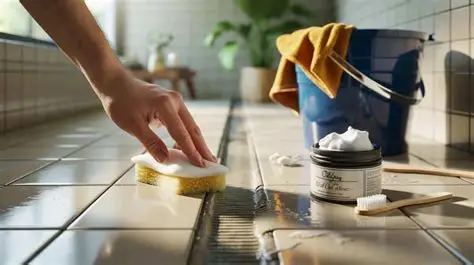
The secret to achieving sparkling clean grout without harsh chemicals lies in a simple, all-natural solution. Forget about scrubbing for hours with vinegar or bleach – this hack uses a powerful yet gentle combination of ingredients to tackle the problem at its source.
The key ingredient? Hydrogen peroxide. This naturally occurring compound is a powerful disinfectant and stain remover, capable of penetrating deep into the porous grout to eliminate mold, mildew, and embedded dirt. Best of all, it’s completely safe and eco-friendly, with no harsh fumes or irritating chemicals.
To create your own grout-transforming solution, simply mix equal parts hydrogen peroxide and water in a spray bottle. Spritz the mixture directly onto the discolored grout, let it sit for a few minutes, then scrub with a stiff-bristle brush. The results will leave you wondering why you’ve been wasting time and energy on other methods all this time.
- ➡Shocking Discovery: Ancient Mosaic Bridges the Gap Between Rome and Egypt
- ➡The Secret Portuguese Fishing Village That’s a Budgeter’s Dream Come True
- ➡The Shocking Secret Disinheritance Tearing Apart the Sawyer Dynasty
- ➡The Shocking Hotel Trick That Removes Limescale in Seconds
- ➡You Won’t Believe Lidl’s Shocking Collab with Money Guru Martin Lewis!
- ➡The Shocking Secret Retirees Are Using to Survive Their Golden Years
- ➡The Billion-Euro Nuclear Deal Reshaping Europe’s Energy Future
- ➡Neuroscientists Unlock the Brain’s “Secret Language” – You Won’t Believe What It Means for Thinking and AI!
Why This Works Better Than Vinegar or Bleach
While vinegar and bleach may seem like logical choices for grout cleaning, they often fall short when it comes to truly restoring the surface to its former glory. Vinegar, while effective at dissolving some types of grime, can actually set in certain stains and discolorations. Bleach, on the other hand, is a harsh chemical that can damage grout and tile over time.
The hydrogen peroxide-based solution, however, attacks the root cause of the problem – the mold and mildew growth – without causing long-term harm. It penetrates deep into the grout, breaking down the stubborn stains and killing off any lingering microbial growth. The result? Bright, fresh-looking grout that’s free of unsightly discoloration.
Plus, this method is much gentler on your hands and the environment, with no harsh fumes or irritants to worry about. It’s a win-win for a sparkling clean floor without the elbow grease.
Making Your Grout Cleaning Solution Last
One of the best things about this grout cleaning hack is that it’s incredibly cost-effective and easy to maintain. Unlike store-bought cleaners that require constant repurchasing, the homemade hydrogen peroxide solution can be made in bulk and stored for repeated use.
- ➡The Secret to Bringing Mediterranean Vibes to Your Dinner Table – For Under $2!
- ➡This Playground Scene Has a Shocking Difference You Won’t Believe! Can You Spot It in 9 Seconds?
- ➡Shocking Footage Reveals the Intimate Moment a Human Embryo Implants in the Uterus
- ➡Shockwaves That Shook the Dawn of Life: The Catastrophic Asteroid Impact That Forged Our World
- ➡The Surprising Trick That Stops Onion Tears for Good
- ➡Shocking Secrets Grandparents Hid from Us: 9 Lost Skills You Need to Master
- ➡The Shocking New Kitchen Gadget That’s Sparking a Culinary Civil War
- ➡Shocking! These Winter Citrus Trees Survive -20°C in Your Garden
Simply mix up a larger batch of the peroxide-water mixture and keep it in a labeled spray bottle. This way, you can tackle grout cleaning as needed without the hassle of repeatedly mixing a new batch. It’s a smart, sustainable solution that will save you time and money in the long run.
And the best part? This solution works just as effectively weeks or even months down the line, so you can enjoy sparkling clean grout for the long haul. No more wasted effort or disappointing results – just a clean, refreshed floor that’s the envy of all your guests.
Common Mistakes to Avoid When Cleaning Grout
Before you start scrubbing away at your grout, there are a few common mistakes to watch out for that can sabotage your efforts. First and foremost, resist the urge to use harsh chemicals like bleach or ammonia-based cleaners. These can actually break down the grout over time, leading to crumbling and discoloration.
Another pitfall to avoid is over-scrubbing. While elbow grease is often necessary for tough grout stains, too much scrubbing can damage the delicate surface and push the dirt and grime deeper into the porous material. Instead, let the cleaning solution do the heavy lifting and use a gentle, back-and-forth motion with your brush.
- ➡The Retired Couple Who Never Worked a Day in Their Lives – But Are Set to Enjoy a Surprisingly Comfortable Pension in 2026
- ➡The Shocking Truth About Limescale: How Emptying Your Kettle Could Save You Hundreds
- ➡Unbelievable Feats of the Elite Alpine Hunters: Mastering the Harshest Terrain on Earth
- ➡This New Promod Crossbody Bag Is Replacing the Iconic Fanny Pack in Spring 2026
- ➡The Forgotten Bathroom Miracle That Makes Toilet Seats Sparkle Like New
- ➡The Shocking Hack That Keeps Ham and Cheese Fresh for Weeks (Without Plastic)
- ➡The Surprising Secret to Attracting Bees with a DIY Insect Hotel Made from Tubes
- ➡Shocking Patio Cleaning Hack Stuns Neighbors – You Won’t Believe The Secret!
Finally, don’t forget to properly seal your grout after cleaning. This protective layer helps prevent future stains and discoloration, ensuring your floors stay looking fresh and vibrant for years to come. With a little know-how and the right approach, you can keep your grout gleaming without all the hassle.
Real-Life Results: What to Expect From This Grout Cleaning Hack
Still skeptical about the power of this grout cleaning solution? Just take a look at the amazing transformations people have achieved with this simple hack.
“I’ve tried every grout cleaner on the market, and nothing has worked as well as this hydrogen peroxide mix,” raves Jessica, a homeowner in Los Angeles. “My floors looked dull and dingy for years, but after just one application, the grout is bright white and the tiles are sparkling. It’s like having a brand new floor!”
And the results aren’t limited to residential settings. Commercial property manager David in Chicago reported similar success: “We used to spend hours scrubbing the grout in our lobby and hallways, but this solution cut the time in half. Plus, the grout has stayed cleaner for much longer. It’s a total game-changer for our busy building.”
- ➡Ditch the Roaming Blues: Unlock the Secrets to Keeping Your German Number Abroad with eSIM
- ➡The Shocking Truth: 3 Sentences That Keep You Trapped in Unhealthy Relationships
- ➡The Fusion Frontier: Canada Leads the Way as First to Take a Fusion Firm Public
- ➡Shocking New Law Forces Tortillas to Get a Makeover in This US State
- ➡The Terrifying Brain Disorder That’s Silently Spreading Across America
- ➡Unlock the Secret to Stress-Free Finances: Discover the Digital Tools Transforming Money Management
- ➡Unbelievable Transformation: How Paris Became a Sustainability Powerhouse by 2050
- ➡Orcas Attacking Yachts and Boats? The Shocking Clash Between Tourists, Activists, and Fishermen at Sea
The proof is in the pudding – or rather, the sparkling clean floors. With this simple, affordable hack, you too can say goodbye to discolored grout and hello to a refreshed, rejuvenated space that’s the envy of all your guests.
FAQs About Grout Cleaning Without Vinegar or Bleach
How often should I clean my grout?
For best results, aim to clean your grout every 6-12 months, depending on foot traffic and usage. This will help prevent stubborn stains and discoloration from setting in.
Can I use this solution on colored or sealed grout?
Yes, the hydrogen peroxide-based cleaner is safe for use on all types of grout, including colored or sealed varieties. Just be sure to test a small, inconspicuous area first to ensure there are no adverse reactions.
How long does the cleaning solution last?
When stored in a sealed container, the hydrogen peroxide-water mixture can last for several months. This makes it a cost-effective, sustainable option for ongoing grout maintenance.
- ➡Discover the Surprising Fruit Tree That Thrives in Cooler Climates
- ➡The Shocking Truth About Your Hips: The Simple Stretches That Banish Chronic Pain (Backed by Science)
- ➡You Won’t Believe What This Chinese Tomato Can Do To Italian Cuisine
- ➡Shocking Trick Chefs Use for Perfect Fried Eggs – You’ll Never Guess What It Is!
- ➡Shocking Discovery: Polar Vortex Turmoil Looms, Experts Warn of Catastrophic Consequences
- ➡The Surprising Superfood That Builds Muscle and Extends Lifespan
- ➡The Surprising Secret Ingredient That Could Slash Concrete’s Massive Carbon Footprint
- ➡The Unbelievable Darkness About to Engulf Major Cities Worldwide – Experts Warn of Catastrophic Blackouts
Do I need to reseal the grout after cleaning?
While not strictly necessary, resealing the grout after cleaning is recommended to help protect against future stains and discoloration. Look for a high-quality grout sealer and apply according to the manufacturer’s instructions.
Will this method work on tile floors as well?
Absolutely! The hydrogen peroxide solution is equally effective at cleaning and restoring tile surfaces. Simply adjust the application and scrubbing techniques as needed to suit your specific floor type.
Can I use this on kitchen or bathroom grout?
Yes, this grout cleaning hack is safe for use in any room of the house, including high-moisture areas like the kitchen and bathroom. The disinfecting power of the hydrogen peroxide helps prevent mold and mildew growth.
How long does the cleaning process take?
Depending on the size of the area and severity of the stains, the entire cleaning process can be completed in 30 minutes to an hour. The key is allowing the solution to fully penetrate the grout before scrubbing.
- ➡The Shocking Truth About Daily Pantyliner Use: Gynecologists Warn of Intimate Zone Damage
- ➡Shocking Obesity Breakthrough: New Drug Helps Shed 20% of Weight, but Doctors Warn of Dangerous Side Effects
- ➡The Hidden Trick That Will Revolutionize How You Sauté Onions
- ➡The Secret Ingredient That Instantly Darkens Grey Hair (You Won’t Believe What It Is!)
- ➡More people are putting aluminum foil on door handles : here’s why
- ➡The Shocking Reason Your Haircut Gets Better With Time (You Won’t Believe It!)
- ➡Psychology Says People Who Can’t Watch Horror Movies Have an Extremely Empathetic Brain
- ➡You Won’t Believe What Happens When the Sky Goes Dark: The Shocking Truth About the Upcoming Solar Eclipse
Will this damage my tile or surrounding surfaces?
No, the hydrogen peroxide-based cleaner is completely safe for use on tile, stone, and other flooring materials. Just be sure to avoid getting the solution on any wood, metal, or painted surfaces, as it can cause discoloration.


