Have you ever wondered why your homemade steaks and chops never quite live up to the juicy, flavorful perfection of those served at your favorite restaurant? The truth is, professional chefs have a few tricks up their sleeves when it comes to searing meat to absolute tenderness. And the best part is, you can easily replicate these techniques in your own kitchen.
Forget about drowning your meat in sauces or marinades to make up for dryness. The secret lies in a simple method that allows you to achieve that coveted restaurant-quality sear without sacrificing the natural juices. By mastering this one simple trick, you’ll be serving up steakhouse-worthy meals in no time.
The Searing Technique Chefs Swear By
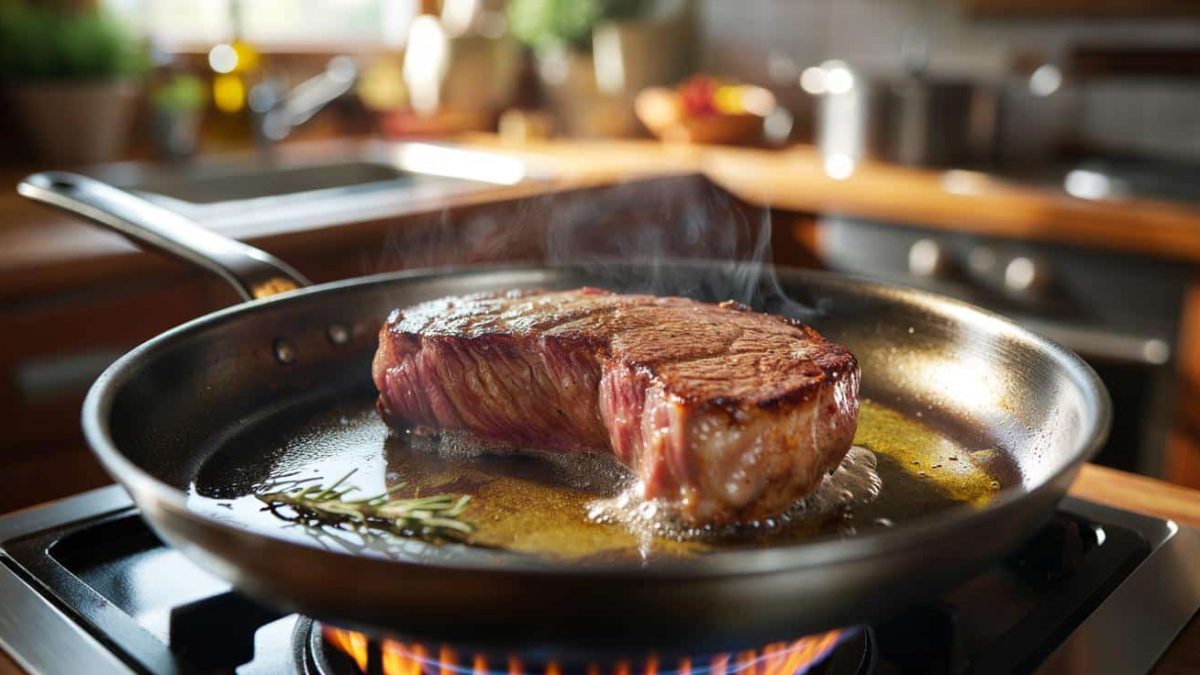
The key to a perfect sear lies in the temperature of your cooking surface. While many home cooks make the mistake of overcrowding the pan or cooking on too low of a heat, chefs know that high, even heat is essential for locking in those natural juices.
Before adding your meat to the pan, make sure it’s ripping hot. Use a cast-iron skillet or stainless steel pan, and let it preheat for several minutes until it’s smoking. This ensures the surface temperature is high enough to create that signature sizzle and caramelized crust the moment the meat hits the pan.
- ➡Shocking Discovery: This “Pink Lady” Apple Is Taking Over Supermarkets Across France
- ➡The Unbelievable Lightning Tree That’s Outpacing Bamboo – And Blooms in Stunning Purple
- ➡You Won’t Believe the Hidden Trick That’s Making You Underestimate Effort!
- ➡This Snowstorm Will Bury Your Town in Shocking Amounts of Snow This Weekend!
- ➡Polar Bear’s Astonishing Swim Across Open Ocean Shocks Scientists: The Stunning Footage You Need to See
- ➡Shocking New Kitchen Appliance Leaves Air Fryers Obsolete – 9 Cooking Modes You Won’t Believe
- ➡Shocking Discovery: Giant Larva Found Lurking in Woman’s Brain in Southeastern Australia
- ➡The Shocking Secret Submarine That Could Cripple NATO’s Defenses
Another pro tip? Dry the meat thoroughly with paper towels before cooking. Any excess moisture will cause the meat to steam rather than sear, resulting in a gray, unappealing finish.
The Importance of Resting
Once your meat has achieved that perfect sear, it’s crucial to let it rest before slicing into it. This allows the juices to redistribute throughout the meat, ensuring every bite is as moist and flavorful as the last.
Professional chefs recommend resting your steak, chops, or roast for 5-10 minutes before serving. During this time, the internal temperature will continue to rise slightly, resulting in a juicier, more evenly cooked piece of meat.
Resist the urge to slice into your protein right away. The resting period is just as important as the searing process itself.
- ➡The Shocking Cleaning Duo That Experts Say You Should Be Using Every Day
- ➡Shocking Secret Whitening Trick Erases Gross Toilet Seat Stains
- ➡The Real Secret to Staying Productive at Home (Hint: It’s Not What You Think)
- ➡Shocking Discovery on Mars: NASA Drills 35 Meters Down and Uncovers a Remarkable Secret
- ➡The Mind-Bending Centrifuge Defying the Laws of Physics: Unraveling China’s Incredible Breakthrough
- ➡Unbelievable Transformation: How Paris Became a Sustainability Powerhouse by 2050
- ➡9 Stunning Long Skirts from Zara, Mango, and H&M to Effortlessly Embrace Spring on a Budget
- ➡5 Reds from Northern Rhône That Will Captivate Wine Lovers
Mastering the Perfect Sear Every Time
With a little practice, you’ll be searing meat like a pro in no time. Start by seasoning your protein generously with salt and pepper, and make sure to pat it dry before cooking.
Heat your pan over high heat until it’s ripping hot, then add a small amount of oil. Carefully place the meat in the pan, making sure not to overcrowd the surface. Resist the temptation to move the meat around – let it sear undisturbed for 2-3 minutes per side.
Once you’ve achieved that perfect golden-brown crust, transfer the pan to the oven to finish cooking until it reaches your desired doneness. Then, let it rest for 5-10 minutes before slicing and serving.
The Secret to Juicy, Flavorful Meat
| Common Mistake | Professional Solution |
|---|---|
| Overcrowding the pan | Cook in batches to ensure even searing |
| Cooking on too low of heat | Preheat pan until it’s ripping hot |
| Not letting meat rest | Allow 5-10 minutes of resting time |
- ➡Shocking Secrets 70-Year-Olds Use to Age Gracefully (You Won’t Believe #6!)
- ➡Discover the Lush, Evergreen Solution That’s Replacing Plastic Screens and Transforming Backyard Retreats
- ➡Shocking Revelation: China’s Covert 200-Mile Barrier Shakes the South China Sea
- ➡Discover the 60-Second Ritual That Can Instantly Transform Your Home Into a Serene Oasis
- ➡The Shocking Reason Why Some People Can’t Stop Thinking About Unsaid Words
- ➡Unveiled: The Towering Ambition of Saudi Arabia’s 1-Kilometer Skyscraper
- ➡The Shocking Truth: When Loneliness No Longer Hurts – The Warning Sign of Emotional Numbness
- ➡Shocking Discovery: China’s “Monster” Energy System Could Revolutionize Renewable Power Forever
By following these simple tips, you can take your home-cooked meats from drab to downright delicious. The secret is all in the technique – high heat, proper searing, and just the right amount of resting time.
“The key to a perfect sear is getting your pan scorching hot. That’s the difference between a juicy, flavorful steak and a dry, gray piece of meat.”
– Chef Jamie Oliver, renowned culinary expert
So the next time you fire up the stove for a steak or chop, keep these pro-level tricks in mind. With a little practice, you’ll be serving up restaurant-quality meals that will have your friends and family raving.
- ➡The Unsung Heroes: How 3 Local Families Remain Among Germany’s 500 Richest
- ➡Explosive Discovery: China Uncovers Massive Lithium Trove Beneath Tibetan Plateau
- ➡The Hidden Electricity Hog Eating Up Your Utility Bill – You Won’t Believe What It Is!
- ➡The Shocking 15-Second Fact That Will Change How You See Space Travel Forever
- ➡Is Your Garden Harboring a Deadly Secret? The Shocking Truth About Snake-Attracting Nightshade
- ➡Shocking Streaming Changes at Canal+: Sharing Banned, Ads Coming Soon!
- ➡Shocking Snowstorm Chaos: Businesses Defy Authorities, Putting Public Safety at Risk
- ➡This Nutrition Expert Swears By the Traditional Baguette – Here’s Why You Should Too
The Science Behind the Sear
The secret to that perfect sear lies in the Maillard reaction – a chemical process that occurs when proteins and sugars in the meat are exposed to high heat. This reaction is responsible for the delicious, caramelized crust that forms on the outside of the meat, locking in all those natural juices and flavors.
To achieve this reaction, the surface of the meat must reach a temperature between 285-325°F. Anything lower, and you’ll end up with a gray, steamed appearance instead of that coveted sear.
That’s why it’s so important to preheat your pan or grill to scorching hot temperatures before adding the meat. This ensures the surface can reach that magic temperature range and create the Maillard reaction in just a couple of minutes.
Secrets from the Steakhouse
| Steakhouse Trick | How to Replicate at Home |
|---|---|
| Using a cast-iron skillet | Cast-iron retains heat exceptionally well for an even, high-heat sear |
| Basting with butter or oil | Baste the meat with a high smoke point oil or clarified butter for extra flavor |
| Finishing in the oven | Transfer the pan to a hot oven to cook the interior to your desired doneness |
- ➡Shocking Tax Nightmare Haunts Retiree: The Dark Side of Kindness
- ➡The 3 Foods That Will Vanish From Your Freezer (And What to Do About It)
- ➡The Blow-Drying Brush That Promises Mirror-Smooth Styling (Even for the Styling-Challenged)
- ➡The Genius Sink Trick That Will Transform Your Home Security (You Won’t Believe It!)
- ➡Beware the Bedtime Betrayal: The Shocking Truth About Ruining Your Sleep With a Shared Mattress
- ➡Exposed: The Shocking Downfall of Saudi Arabia’s $500 Billion Megacity Dream
- ➡The Shocking Potato Secret That Has Mechanics Scratching Their Heads
- ➡The Common Sweetener That Could Reverse Baldness Overnight – Shocking Discovery!
“The secret to a great sear is all about managing the temperature. You want that pan ripping hot to get maximum caramelization on the outside while keeping the inside perfectly cooked.”
– Cory Vitiello, executive chef and restaurateur
By taking a few cues from the pros, you can bring that signature steakhouse experience right into your own kitchen. With the right techniques and a little practice, searing meat to perfection has never been easier.
Common Questions about Searing Meat
What’s the best type of pan for searing meat?
A cast-iron skillet or stainless steel pan are your best bets for achieving an even, high-heat sear. The key is finding a pan that retains heat exceptionally well.
- ➡The Shocking Superpower of Beets That Seniors Are Harnessing to Beat High Blood Pressure
- ➡Jaw-Dropping Discovery: Captain Cook’s Long-Lost Ship Found Intact Off the Australian Coast!
- ➡The Surprising Secrets Inside Your Inner Monologue: Unlocking Your Mind’s Extraordinary Potential
- ➡Shocking Cleaning Hack: Just One Spoon of This Cheap Kitchen Staple Leaves Floors Sparkling for a Week!
- ➡Unlock the Secret to Combating Loneliness: The Top 4 Online Communities for Organizing Themed Walks in Your Area
- ➡The Shocking Revelation: Our Sun May Have Escaped the Galactic Core with Thousands of Twin Stars 5 Billion Years Ago
- ➡The Shocking Brain Hacks You Need to Protect Your Mind (No One’s Told You About)
- ➡The Korean Skin Ritual Your Grandma Swore By (And You’ll Never Guess Why)
How long should I sear the meat for?
Generally, you’ll want to sear the meat for 2-3 minutes per side to get that perfect golden-brown crust. The exact timing will depend on the thickness of the cut and your desired level of doneness.
Do I need to use oil when searing?
Yes, a small amount of oil with a high smoke point (such as avocado or grapeseed oil) is essential for creating that signature sear. The oil helps conduct heat and prevents the meat from sticking to the pan.
How do I know when my pan is hot enough?
The pan is ready when it’s smoking slightly. You can also test the heat by sprinkling a few drops of water in the pan – if they sizzle and evaporate immediately, you’re good to go.
Should I flip the meat more than once while searing?
No, resist the urge to flip the meat multiple times. Letting it sear undisturbed for 2-3 minutes per side is key for achieving that perfect crust.
- ➡Shocking Astrological Prediction: These Signs Will Skyrocket on March 28, 2026
- ➡The Shocking Caffeine Bombs Lurking in Your Grocery Cart: 6 Coffee Brands that Could Harm Your Health
- ➡The Surprising Link Between Your Beer Habits and Mosquito Bites
- ➡Unveiled: The Game-Changing Drone Shaking Up the War on Drugs
- ➡You’ll Never Guess What Ikea’s New Sofa Can Do! The Future of Tiny Home Living is Here
- ➡The Unbelievable Trick That Banishes Kitchen Cabinet Grease in Minutes!
- ➡Psychology Says People Who Love Being in the Rain Have a Hidden Emotional Depth
- ➡The Surprising Secret to Unlocking Your Full Potential (You’ll Be Shocked!)
How do I know when the meat is done?
Use a meat thermometer to monitor the internal temperature. For most cuts, you’ll want to pull it from the heat around 5°F below your desired doneness, as the temperature will continue to rise during the resting period.
Do I need to let the meat rest?
Yes, resting the meat for 5-10 minutes is a crucial final step. This allows the juices to redistribute, resulting in a juicier, more flavorful final product.
Can I sear frozen meat?
It’s best to sear meat that’s been fully thawed. Trying to sear frozen meat can cause it to steam and result in a gray, unappetizing finish.


