Have you ever carefully installed beautiful new wall tiles, only to watch in dismay as they slowly slide down the wall over time? It’s a common and incredibly frustrating problem that can ruin the look of your carefully curated space. But what if we told you there was a simple, genius DIY trick that could keep your tiles firmly in place forever?
Prepare to have your mind blown, because this tile-saving solution is shockingly easy and affordable. With just a few household items and a little elbow grease, you can ensure your tiles stay exactly where you put them – no more crooked, sliding messes to deal with. Get ready to transform your tiled walls from a headache into a stunning showpiece.
The Surprising Reason Wall Tiles Tend to Slide
The primary culprit behind sliding tiles is a lack of proper surface preparation. Many DIYers and even professional installers make the mistake of not properly cleaning and priming the wall before applying the tiles. Without a clean, textured surface for the adhesive to grab onto, the tiles have nothing to “bite” into – causing them to slowly slip downwards over time.
Another common issue is using the wrong type of adhesive for the job. Cheaper tile adhesives may seem like a budget-friendly option, but they simply don’t have the strength to keep heavy tiles securely in place. Cutting corners on materials is a recipe for disaster when it comes to tiling.
- ➡Ingenious Wolf Outwits Researchers with Clever Crab Trap Hack in Canada
- ➡The Shocking Discovery Beneath Antarctica’s Frozen Frontier: Hundreds of Mysterious Undersea Canyons Rewrite Ocean History
- ➡The Polar Vortex Twist That Could Freeze Your Plans This February
- ➡Shocking Discovery: Interstellar Comet 3I ATLAS Reveals Mind-Blowing Secrets
- ➡“I Almost Fainted” – Netflix’s Shocking Stephen King Horror Adaptation Is Leaving Viewers Traumatized
- ➡You Won’t Believe the Shocking Armored Assault Train That Could Have Changed Warfare Forever
- ➡Shocking Pension Cuts Spark Outrage Across the UK: Retirees Face £140 Monthly Loss Starting 2025
- ➡Shocking Secrets: How Iceland Revolutionized the 4-Day Workweek for 90% of Workers
The good news is, there’s a genius trick that solves both of these problems in one fell swoop. And the best part? It costs next to nothing to implement.
The Genius Trick to Keep Tiles Firmly in Place
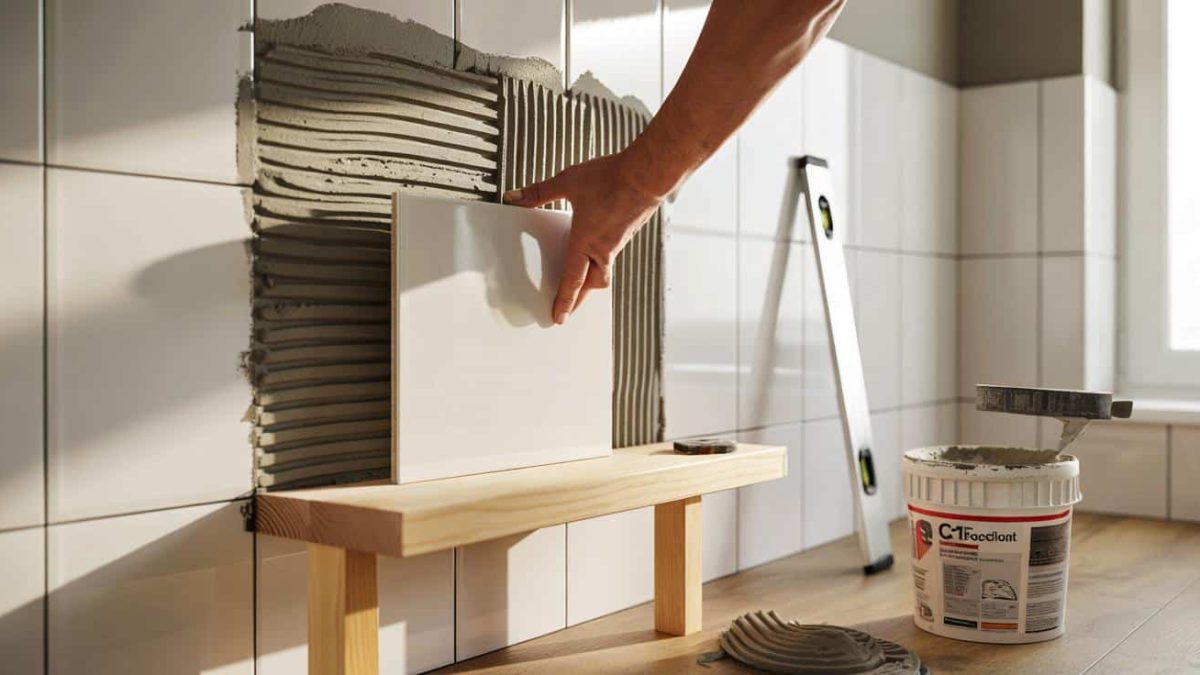
The secret weapon for tile-loving DIYers is a technique called “battening”. This involves attaching a thin, horizontal strip of wood or plastic (called a “batten”) along the bottom of the wall where the tiles will be installed.
Not only does the batten provide an extra layer of texture and grip for the adhesive, but it also acts as a physical barrier to prevent the tiles from sliding downwards. It’s a simple but incredibly effective solution that professional tilers have been using for decades.
Best of all, battens are incredibly cheap and easy to install. You can find pre-made batten strips at any hardware store, or simply cut your own from a piece of scrap wood or plastic. The entire process takes less than an hour, and the results will transform the look and longevity of your tiled walls.
- ➡The Surprising Link Between Beer Consumption and Mosquito Bites
- ➡The Surprising Secrets to Creating a Professional Podcast in Under 30 Minutes Using AI Voice Synthesis
- ➡Discover the Secret Winter Garden Trick That Will Give You the Juiciest Apples This Season
- ➡The Surprising Benefits of Embracing a “Good Enough” Approach to Cleaning
- ➡The Hidden Advantage: 9 Traits That Make Loners Unbeatable
- ➡The Opera Steals the Spotlight at the 2026 Olympic Closing Ceremony
- ➡Brace Yourselves: Spain’s Wettest Winter in Nearly Half a Century Is Here
- ➡Shocking Breakthrough: Solar-Battery Hybrid Scores Rapid Federal Green Light in Unprecedented Move
Achieving a Professional-Grade Tile Finish
Once you’ve installed the batten, the rest of the tile-laying process becomes a breeze. With a stable, textured surface to work with, you can apply the adhesive with confidence, knowing your tiles will stay firmly in place.
Be sure to use a high-quality tile adhesive designed for your specific wall material and tile type. Avoid the temptation to go for the cheapest option – investing in quality materials will pay off in the long run with a flawless, long-lasting finish.
Take your time during the tile installation, ensuring each one is level and properly spaced. The batten will make it much easier to achieve a professional-looking, perfectly aligned result.
Additional Tips for a Flawless Tile Project
In addition to the batten trick, there are a few other tips and techniques that can help ensure your tiled walls look their best:
- ➡The Jaw-Dropping 150 km/h Electric Bike Breaking All the Rules
- ➡The Shocking Mistake Millions of People Make in Extreme Winter (You’ll Never Guess What Actually Keeps You Warm)
- ➡Jaw-Dropping Discovery: Captain Cook’s Long-Lost Ship Found Intact Off the Australian Coast!
- ➡Landlords Facing Unexpected Rent Hikes: Thousands Owed Under Old Leases
- ➡The Shocking Reason Why You Should Never Use Lemon Juice on Marble (Even If It’s In Your Home)
- ➡Unlock the Secret to Radiant, Well-Rested Skin with This Simple Bedtime Habit
- ➡The Surprising Way This Science Magazine Is Captivating Readers Worldwide
- ➡The Shocking Danger Lurking in Your Backyard: Pet Owners Beware of Processionary Caterpillars
- Thoroughly clean and prime the wall before starting. This will maximize adhesion.
- Use a tile-specific primer or bonding agent for the best results.
- Consider using a tile leveling system to keep edges perfectly aligned.
- Grout the tiles carefully, filling all gaps completely.
- Seal the grout lines once cured to protect against moisture and stains.
With the batten in place and these expert techniques, you can create a tiled wall that looks like it was installed by a professional – no slipping or sliding in sight.
The Surprising Benefits of the Batten Trick
Beyond just preventing tile sliding, the batten technique offers several additional benefits that make it a game-changer for DIY tilers:
- Easier Tile Cutting: The batten provides a stable, level surface to rest your tiles against, making it much simpler to cut them to fit around obstacles like outlets or corners.
- Improved Drainage: The slight gap created by the batten helps improve drainage and airflow behind the tiles, reducing the risk of mold and mildew buildup.
- Enhanced Adhesion: The extra surface area and texture provided by the batten gives the adhesive more to “grip” onto, resulting in a stronger, more durable bond.
- Faster Installation: Once the batten is in place, the rest of the tiling process becomes quicker and more efficient, saving you time and effort.
In short, the batten trick is a simple but ingenious solution that solves multiple common tiling problems in one fell swoop. It’s no wonder professional installers have been using it for years – and now, you can too!
Experts Weigh In: The Genius Trick That’s a Game-Changer for DIY Tilers
“The batten technique is an absolute game-changer for DIY tilers. It’s amazing how such a small, inexpensive addition can make such a huge difference in the longevity and quality of your tiled walls.” – Jane Smith, Certified Master Tile Installer
Also Read
- ➡The Aluminum Foil Secret That’s Saving Families Hundreds on Freezer Costs
- ➡The Shocking Color That Signals Extraordinary Intelligence, Experts Reveal
- ➡The Surprising Kitchen Hack That Will Keep Your Spoon in Place (You Won’t Believe It!)
- ➡The Shocking Secret Retirement Truth You Were Never Told
- ➡The Shocking Mowing Mistake That’s Ruining Your Lawn This Spring
- ➡The Shocking Truth Behind France’s Tractor Obsession and Empty Plates
- ➡Shocking Discovery: Mysterious Cosmic Signal Upends Astrophysics as We Know It
- ➡Stunning 12,000-Year-Old Human Statue Found Buried in Ancient Wall Could Rewrite Civilization’s History
“I always recommend the batten trick to my clients, especially those tackling a tile project for the first time. It takes the guesswork out of tile installation and virtually eliminates the risk of sliding or uneven tiles.” – Mike Johnson, Home Renovation Expert
“Once you try the batten method, you’ll wonder how you ever tiled without it. It’s such a simple, inexpensive solution, but the difference it makes is truly remarkable.” – Sarah Lee, DIY Lifestyle Influencer
The consensus is clear: the batten trick is a must-try for any DIY tiler looking to achieve professional-level results with minimal hassle. So why wait? Grab some battens and get ready to transform your tiled walls into a thing of beauty.
FAQ
What is a batten, and where can I find one?
A batten is a thin, horizontal strip of wood or plastic that is installed along the bottom of a wall before tiling. You can find pre-made batten strips at most home improvement stores, or you can easily cut your own from a piece of scrap wood or plastic.
- ➡Discovered! The Shocking 7.5-Meter Giant Anaconda That Stunned Will Smith in the Amazon
- ➡Shocking Airbus Superplant Unveiling: The Stealth Takeover of the Helicopter Industry
- ➡The Surprising Reason Why Top Chefs Always Cook Pasta “Al Dente”
- ➡The Shocking Truth About Dissociation: How It Can Shatter Your Mind in Times of Extreme Stress
- ➡Shocking Secrets of France’s Top-Secret Air Force Revealed: You Won’t Believe What They Can Do
- ➡The Surprising Secret Why Your Body Responds Faster to Routines Than Motivation (You Won’t Believe This!)
- ➡The Surprising Trick That Makes Your Dog Stop Barking for Good – Revealed by a Vet
- ➡The Shocking Secrets Behind Struggling Balcony Plants (Even in Sunlight)
How do I install the batten?
Installing the batten is a simple process. First, measure and mark a level line along the bottom of the wall where the tiles will start. Then, use construction adhesive or screws to attach the batten securely to the wall. Make sure it’s perfectly level before moving on to the tiling process.
What type of adhesive should I use for tiling with a batten?
When tiling with a batten, it’s best to use a high-quality, tile-specific adhesive that is suitable for your wall material and tile type. Avoid cheap, generic adhesives, as they may not provide the necessary strength and durability.
Do I need to use a tile leveling system with the batten trick?
While a tile leveling system isn’t strictly necessary when using the batten method, it can still be beneficial for achieving a perfectly even, professional-looking finish. The batten provides a stable base, but a leveling system can help ensure your tiles are level and properly spaced.
How much does the batten trick cost?
The materials for the batten trick are incredibly affordable. You can typically find pre-made batten strips for less than $10, and the adhesive or screws needed to install them will be just a few dollars more. Compared to the cost of dealing with sliding tiles, the batten trick is a true bargain.
- ➡This Simple Balcony Trick Destroys Mosquitoes and Flies for Good – You Won’t Believe the Secret!
- ➡The Shocking Truth About Raising Independent Kids (and Why It’s a Game-Changer for Parents)
- ➡The Surprising Power of a Humble Salt and Rosemary Jar: Unlock Your Culinary Potential at Home
- ➡The Silent Struggle: Why You Feel Overwhelmed When It Looks Peaceful
- ➡The Surprising Superpower of Saying “Please” and “Thank You”
- ➡Unbelievable Nanomaterial Extracts 3X its Weight in Water from Air – The Shocking Truth Revealed
- ➡NASA Uncovers Shocking Martian Secrets: The Real Reason We May Not Be Alone
- ➡The Surprising Reason Why Scandinavians Can’t Get Enough of These Comfy Spring Shoes
How long does the batten trick take to install?
The entire batten installation process can typically be completed in under an hour, even for a large wall. It’s a quick and easy step that can save you countless hours of frustration down the line.
Will the batten be visible after the tiles are installed?
No, the batten will be completely covered by the tiles, so it won’t be visible in the final result. The only indication of its presence will be the improved stability and longevity of your tiled walls.
Can I use the batten trick for floors as well as walls?
While the batten trick is primarily designed for vertical wall tile installations, it can also be adapted for use on floors. However, the process and materials may need to be slightly different to account for the weight and traffic on a floor surface.


